Showing posts with label medicine. Show all posts

Thursday, September 11, 2014

A Look Inside an Old Medicine Chest

     It’s time to take a look at another one of my favorite artifacts! 


At first glance, it simply looks like a wooden chest with a lock, drawer, and dovetailed joints.  Though not visible in this shot, there is also a metal handle on each side of the chest.  Once you know that the chest was made for an apothecary named Dr. Thomas Ritter, you get a better idea of what it contains. 


The upper portion of the chest is filled with medicine containers.  It appears that only one container is missing, so it is nearly complete!  In addition, all but one of the containers still retain their labels, so this gives us a good idea of the types of medicines in general use in the mid-19th century.  

The drawer, which is stuck shut, would have held a small set of apothecary scales and weights, and some basic medical supplies.


     I discovered that Dr. Ritter wrote a book to accompany his medical chests, "A Medical Manual and Medicine Chest Companion".  Though it pretty much starts as an ad for his product, this book also contains a list of the medicines in the chest along with their uses and dosages, “recipes” for some of the remedies of the time, and a guide for treating various ailments. 

     Here’s what Dr. Ritter has to say about his product, “The subscriber [Dr. Ritter] devotes his energies chiefly to the business of putting up Medicine Chests for families, ships, and plantations.  His prices for new chests, and for replenishing, have given very general satisfaction.  Having put up some thousands, he ventures to say, that for neatness of style, the excellent quality of the medicines, and for the care taken for the preservation of the perishable articles, he is exceeded by no one in the country.  In the replenishing of Medicine Chests, he is strictly careful to put up only such quantities as may be needed, never crowding the chest in order to enhance the amount of the bill."


This view shows the wooden dividers in the upper portion of the chest, which helped to protect the medicine containers.  The missing container would have been in the bottom middle section.  Also, if you look carefully you’ll see a few glass containers which look a bit too small for their compartments.  These containers are not original to this chest.


     These chests were somewhat customizable, so that his customers could choose some of the medicines which went into them.  He charged according to the amount of containers inside the chest, which explains his comment about enhancing the bill!


This is one of the larger ironstone containers in the chest (from the top row in the photo), which held Epsom salts.


     In the book there is an entry for “No. 8 – Epsom Salts” which reads, “May be taken in the dose from one to two ounces, or two to four large spoonsful dissolved in a tumbler of cold water.  They are a very cooling purge in fevers, and in external and internal inflammation. 

When a person has taken, by mistake or otherwise, an overdose of sugar of lead, or extract of lead, the best antidote to the poison is Epsom salts, dissolved and drank as soon as possible.  They decompose the poison, and carry it out of the system.”


A smaller ironstone container (from the row at the bottom of the photo) is labeled, “31- Mercurial Ointment.”


     According to Dr. Ritter’s book, mercurial ointment was used, “to destroy vermin upon the human body.  Rub a little on the parts affected.  (See Venereal Diseases.)  Steel and iron, covered with a little of this ointment, will be preserved a long time free from rust.”  I like how he worked in a household use for his medicine too!


One of the square glass containers held sulphuric ether, which apparently was one of Dr. Ritter’s favorite medicines!
 

     The entry for “No. 21 - Sulphuric Ether” reads, “This medicine ought to be in every medicine chest, and every family.  Its great variety of uses, its instant operation, renders it of great value in sudden attacks.  Its influence is felt to the ends of the fingers and toes almost as soon as swallowed.  It relieves cramps, dizziness, palpitation of the heart, cholera morbus, Asiatic cholera, faintings, wind in the stomach and bowels, producing colic.  Asthma is relieved, on breathing the vapor of ether.  It may be used for wind-colic by injection, mixed with the common laxative injection.  I have never found any remedy so speedily to compose both mind and body, in delirium tremens, or the horrors, after an emetic.  It is also useful in dyspepsia, combined with Tinct. Bark (No. 25,) three or four times a day.  It may be applied externally for headache, toothache, rheumatism, gout, ruptures.  Dose, one teaspoonful, in sugar and water, every half-hour, until relief ensues.

The water and sugar should be first mixed, and when the patient is ready to receive the dose, the ether should be added and swallowed immediately, as it evaporates very rapidly.  Great care should be taken to keep this article from a lamp, as it takes fire as readily as gun-powder.”
     
      I just hope he didn’t discover that last part by accident!

     This medicine chest is currently on display here at the National Museum of Civil War Medicine, so that everyone can see it and all of its medicine containers.  

Photos courtesy of the National Museum of Civil War Medicine.

Thursday, May 23, 2013

Myths of Civil War Medicine


     One of the things we try to do through the exhibits at the National Museum of Civil War Medicine is to dispel some common myths about medical practices during the Civil War.  Probably the most common misconception regards the surgeons as being uneducated butchers who indiscriminately amputated limbs from wounded soldiers.  In fact, though the term “sawbones” does predate the Civil War, it is most strongly associated with Civil War surgeons. 

     The truth is that the surgeons were educated.  The majority of Civil War surgeons attended medical school or trained with an established doctor.  Additionally, they were required to pass an exam before they were allowed to serve as a surgeon in the army. 


This is an admission card for a medical class at the University of New York, dated 1850.  Medical students purchased these cards for admissions into the lectures.  Note that it signed by the student, Jacob Ebersole, and the professor, Elisha Bartlett.


     The staggering number of amputations performed was not due to incompetence.  That can mostly be blamed on the new rifled musket technology and the Minié ball.  The severe tissue and bone damage done by the Minié ball made it necessary for surgeons to perform amputations.  Repairing the damage was simply not possible at that time, and amputation was the best way to save the life of the wounded soldier.


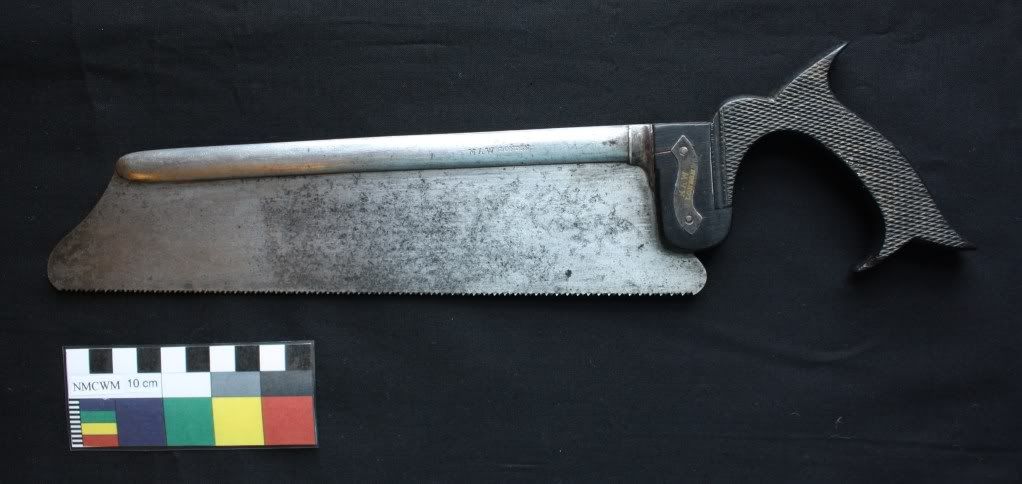
An amputation saw is the instrument which comes to mind for most people when Civil War medicine is mentioned.  This saw has an ebony wood handle with a cross-hatching design which provided a bit more grip.  Notice that the blade of this saw can be replaced.


     Another myth which has been reinforced in some old movies, is that many amputations were done without anesthesia.  Patients undergoing amputations were reportedly were given bullets to bite on for the pain, hence the expression, “to bite the bullet.”  I can tell you that is one expression which is not used at my museum! 

     The truth here is that before the Civil War, the anesthetic qualities of both chloroform and ether were known.  The first surgery using ether as an anesthetic was performed in 1846, well before the start of the Civil War.  The fact is that some form of anesthesia was used in 95% of Civil War surgeries. 


This medical tin contained chloroform, and was part of a U.S.A. Medical Department hospital kit from the Civil War.


     Another myth is that there were no effective drugs available during the Civil War.  Admittedly, there were some remedies which were ineffective, and others which were downright dangerous.  However, there were many medications available which were quite effective.  Morphine and opium were used in the Civil War, and opiates continue to be used as painkillers.  Civil War soldiers were often successfully vaccinated against smallpox, and we continue to use vaccines to protect us from many diseases. 


This medical tin contained quinine, which was (and still is) used to combat malaria. 


     One more myth is that the Civil War surgeons did not have to deal with the amount of paperwork which is common today.  However, in addition to their other duties, they actually had quite a bit of time-consuming paperwork to complete.  Surgeons had to keep records of the daily sick call, patient rosters from the hospitals, their surgical case notes, lists of the discharged and deceased soldiers, records of the medicines and hospital stores they received, and sometimes even weather data.  They also had to send requisitions for medical supplies, as well as monthly reports to the Surgeon General's Office.


This is a “Form for Examining a Recruit” which was filled out by Inspecting Surgeon John H. Mackie on October 16th, 1862.  The subject was a 25-year-old recruit named James Smith from Biddeford, Maine, who listed his occupation as a laborer.  The only area of concern listed is where it is noted that he is missing one upper incisor.  He was approved.


Here is a surgeon’s Morning Report book.  Take a closer look at the line near the bottom which reads, “Put up by Edward R. Squibb, M.D.”  Does that name sound familiar?  If you’ve heard of the pharmaceutical company, Bristol-Myers Squibb, you now know one of its founders!


     This all makes me wonder if the fellows from the Mythbusters television show would ever tackle any of these myths!


Photos courtesy of the National Museum of Civil War Medicine.

Thursday, March 7, 2013

A Fake Pharmacy


     Normally when I put together an exhibit I work with artifacts which go inside the display cases, and reproductions of artifacts for what we call the immersion displays.  Usually the reproduction items are things like uniforms for the mannequins, Civil War period furniture, and surgical kits and instruments which can be purchased from various sources, or donated by generous museum patrons!  Sometimes though, I have to get creative and make them myself.

     Recently, it was decided that we needed to upgrade a portion of our Pavilion Hospital gallery.  This gallery depicts part of a fixed-bed hospital, complete with hospital beds, patients, a Sisters of Charity nurse, a surgeon, and a hospital steward.
 
Here’s the hospital steward reaching into the pharmacy cabinet in the Pavilion Hospital gallery. The medicine bottles and labels needed to be changed so that they were more correct for the period being portrayed.


     First, some appropriate bottles were purchased, and then I had to work on creating the labels and the contents.
 
The labels which came on the bottles were not appropriate for our needs, so I first worked on removing them. I succeeded in scraping off one before I decided it would make more sense to simply turn them around and put the correct labels on the other side!
 

     The labels were easy, since our Education Department had already reproduced some labels from Civil War medical bottles to use with some of their props.
 
Here are some of the reproduction labels on some of the bottles and a tin.
 

For comparison, this is one of the original labels on an original medical bottle. 


     The more difficult task was reproducing the contents of the medicine bottles.  I obviously couldn’t use real drugs!  I also couldn’t use any materials which could cause damage to the exhibit if they spilled, or which could attract insects. 

     I tackled the powders first.  Baking soda worked for most of them, and was fairly easily dyed various colors using food coloring.  I would put the baking soda into a sealable plastic bag, add the food coloring, and knead the bag until the color was uniformly distributed.  Tartar emetic can be simulated using plain baking soda, and potassium iodide can be simulated using baking soda tinted with some red food coloring.

     Crystals were mimicked using salt.  I used rock salt for the larger crystals, and table salt for the small crystals.  I found that the table salt could be colored in the same manner as the baking powder.  Rock salt can be used to simulate silver nitrate, while table salt can be used for sugar.

     For the pills, I found that white air-dry clay worked the best.  The clay was reasonably easy to handle, could also be colored with food coloring, and I didn’t have to deal with baking it.  I have to admit that I felt a little silly sitting in my office rolling out little balls of clay though!  White pills were used to simulate ipecac and cathartic pills.  Blue pills were used for “blue mass” or mercury pills. 
 
Here is my first batch of fake pills!
  
 
     The liquids were the hardest to simulate.  I did not want any actual liquids in the display, since there would be too much chance of them leaking or being spilled.  I ended up using a clear two-step resin to simulate liquids in the bottles.  I used a clear resin to simulate alcohol and a darker one to simulate iodine. 
 
I did have to take this one to my work room, as it required more ventilation. 
 

The resin worked well, and the labels seen on the backs of the bottles won’t be visible once I put labels on the fronts.
 
And, here are some of the finished bottles. You can see that I was able to use one real ingredient – the coffee!


     So, now our pharmacy cabinet has a much more accurate appearance.  Just don’t try to sample any of the medicines! 


Photos courtesy of the National Museum of Civil War Medicine.

Thursday, January 17, 2013

Amputation Instruments


     There’s a story the Director of our museum (George) likes to tell about overhearing two people on the street debating over whether or not to visit the museum.  The wife was looking in the front window and commenting that she’d like to take the tour.  Her husband replied, “Civil War medicine?  It’s just a saw!”  At that point, George stepped up and offered to show them the museum, as well as how much more there was to Civil War medicine than an amputation saw.


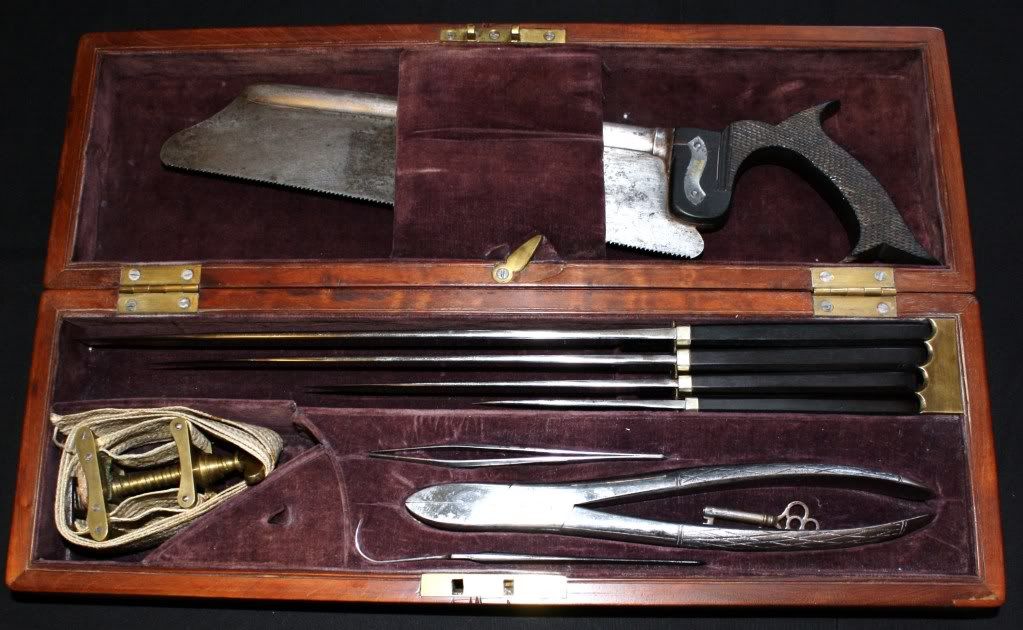
Here is what most people associate with Civil War medicine - an amputation kit. This is a nice example of an amputation kit with a rosewood case and the basic instruments (including the saw!) needed to perform an amputation.  


       Sadly, this has been the image of Civil War medicine for quite some time.  Even during the war, the surgeons were judged to be “butchers” for performing so many amputations.  The image has persisted through the years, and many people still have the idea that Civil War surgeons were heartless and incompetent.  The simple truth is that these surgeons were saving lives in the best way that the knowledge and technology of the time allowed.

     There is no doubt that amputations were a big part of Civil War medicine though. So, let’s take a look at some of the instruments that were used.
 
 
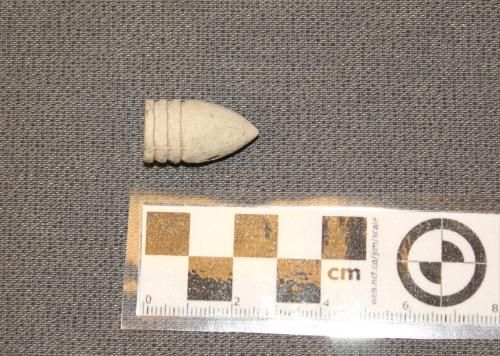
This is the culprit responsible for the necessity of so many amputations - the Minié ball. These bullets caused tremendous damage to soft tissue and to bones. One medical textbook of the time describes the damage as
“….truly terrible; bones are ground almost to powder, muscles, ligaments, and tendons torn away, and parts otherwise so mutilated, that loss of life, certainly of limb, is almost an inevitable consequence.”
 

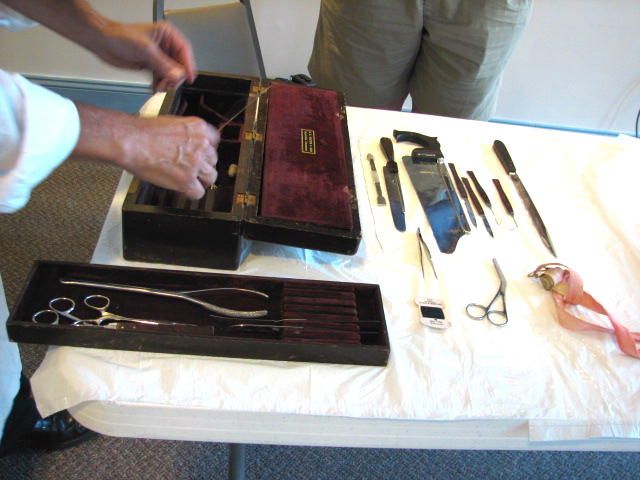
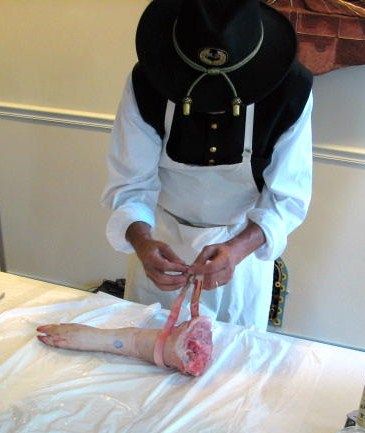
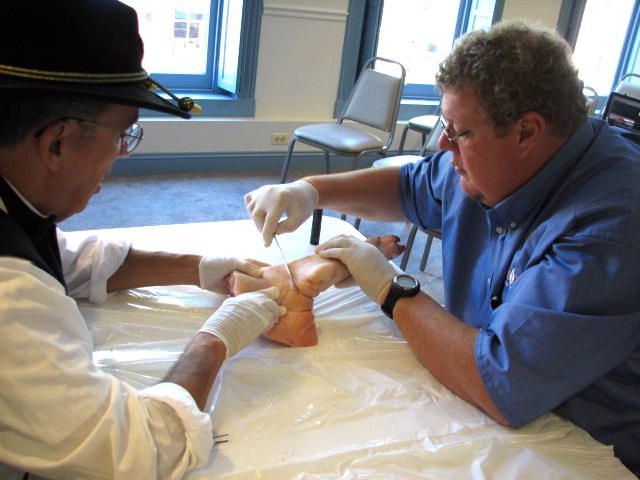
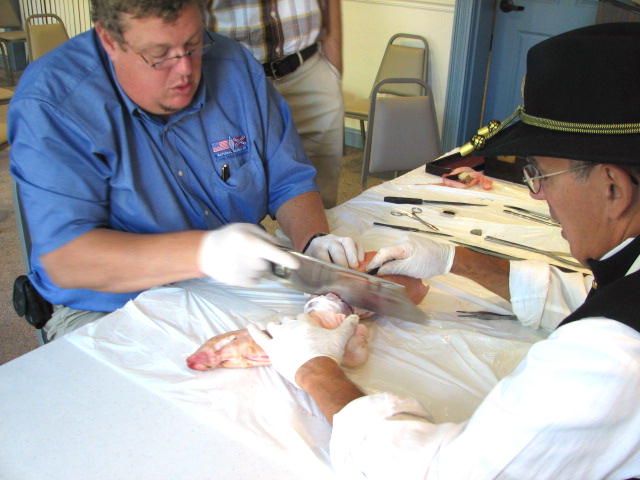
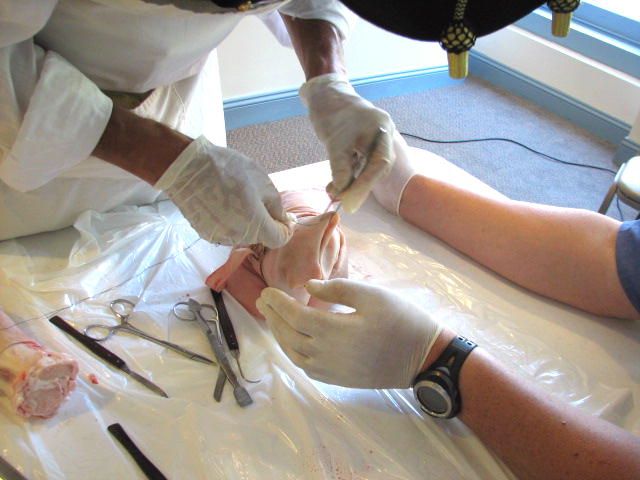
One of our volunteers is a present-day surgeon, even though he dresses as a Civil War surgeon at the museum! He took our Director, George, through the amputation process, using a pig leg. 
Don’t worry; even though those instruments look old, they are actually reproductions of Civil War instruments. I wouldn’t let them use the real ones! 


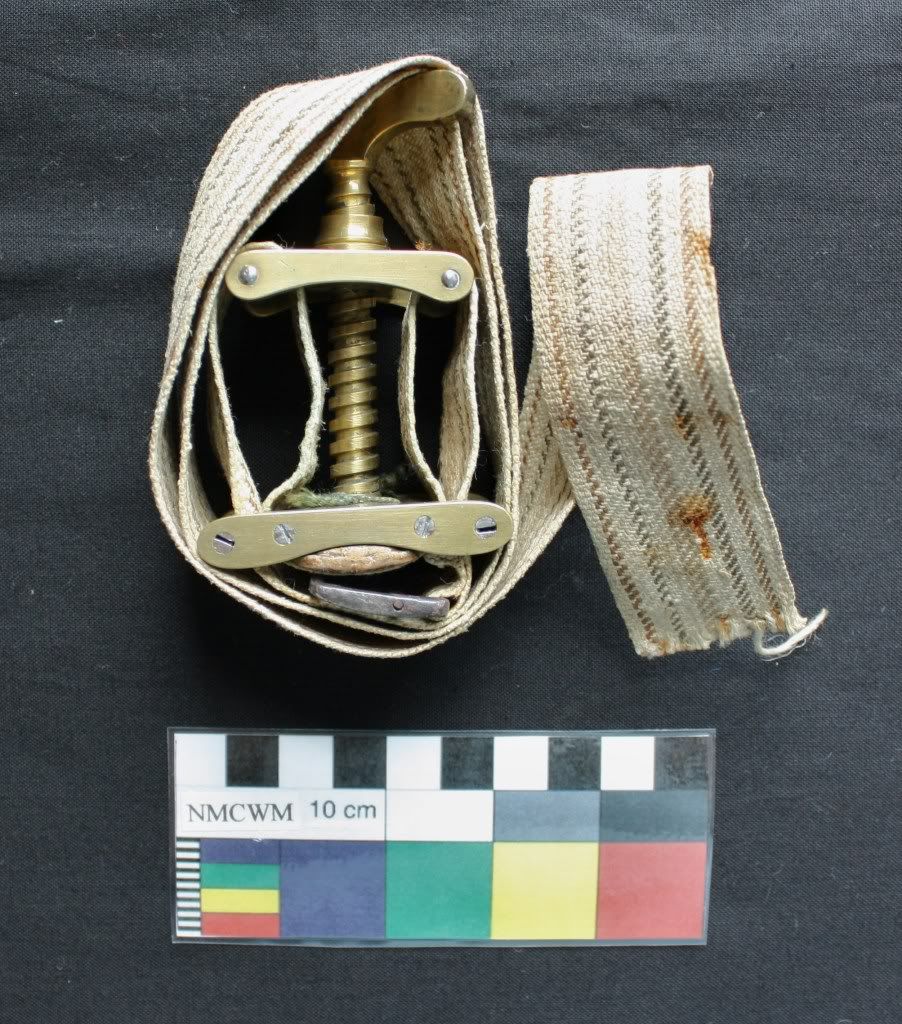
Normally the first step in an amputation was to anesthetize the patient, but obviously that was unnecessary for this“patient.” The next step would be to apply a tourniquet to the limb above the wound, to stop or slow the bleeding.


Here is an example of a Petit’s screw tourniquet, which would have been used in the Civil War.


     There were two main methods of amputation used in the Civil War.  The flap method left flaps of skin and muscle which would be used to cover the stump at the completion of the operation.  A V-shaped cut would be made, and then the bone would cut away a few inches above the flaps.  In a circular amputation, the surgeon basically cut in a circle around the limb, would draw back the skin slightly and then cut straight across the bone. 

 
George uses an amputation knife to make the first incision through the skin and muscle. Afterwards, the skin and muscle will be pulled back slightly from the bone. 
 I will point out here that Civil War surgeons did not wear gloves.

 
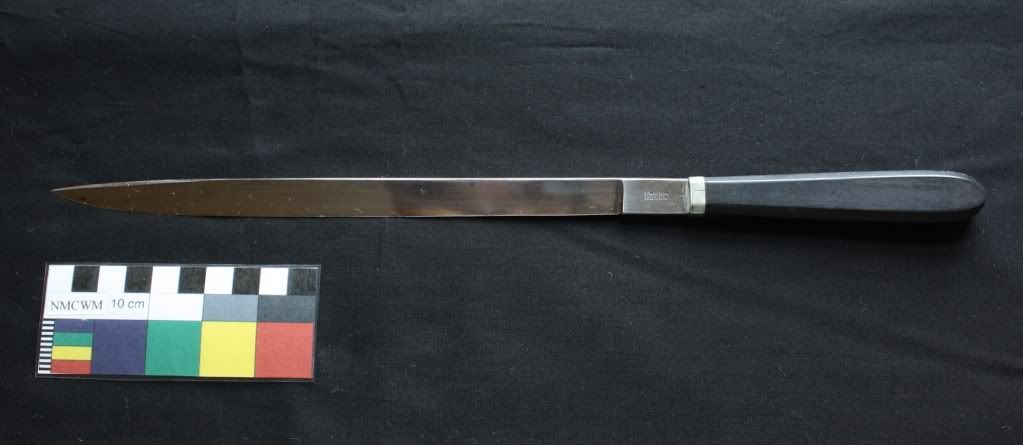
This amputation knife is similar to the one being used in the photo above. Single-edged amputation knives were used for circular amputations.

 
This double-edged amputation knife is called a catlin. It was more commonly used in flap amputations.


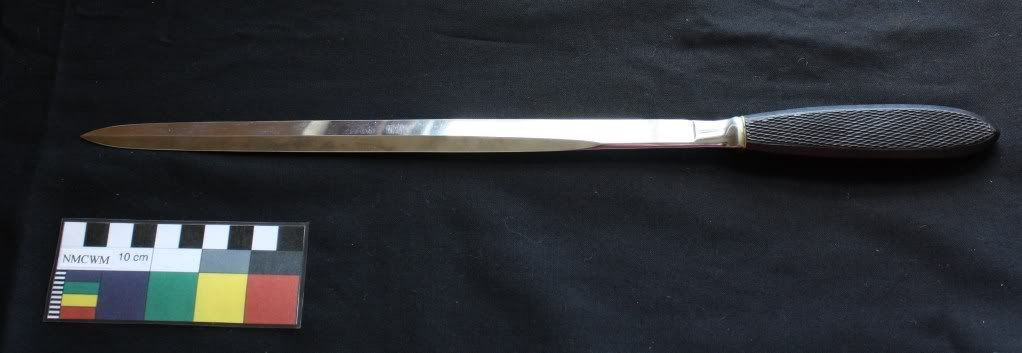
The amputation saw was used just to cut through the bone.


This is a typical amputation saw with a “fishtail” handle. The checkered texture on the handle gave the user a better grip. Operating quickly was important. There was less chance of shock to the patient, and it allowed the surgeon to move on to the next patient quickly. Most amputations were done in less than ten minutes!


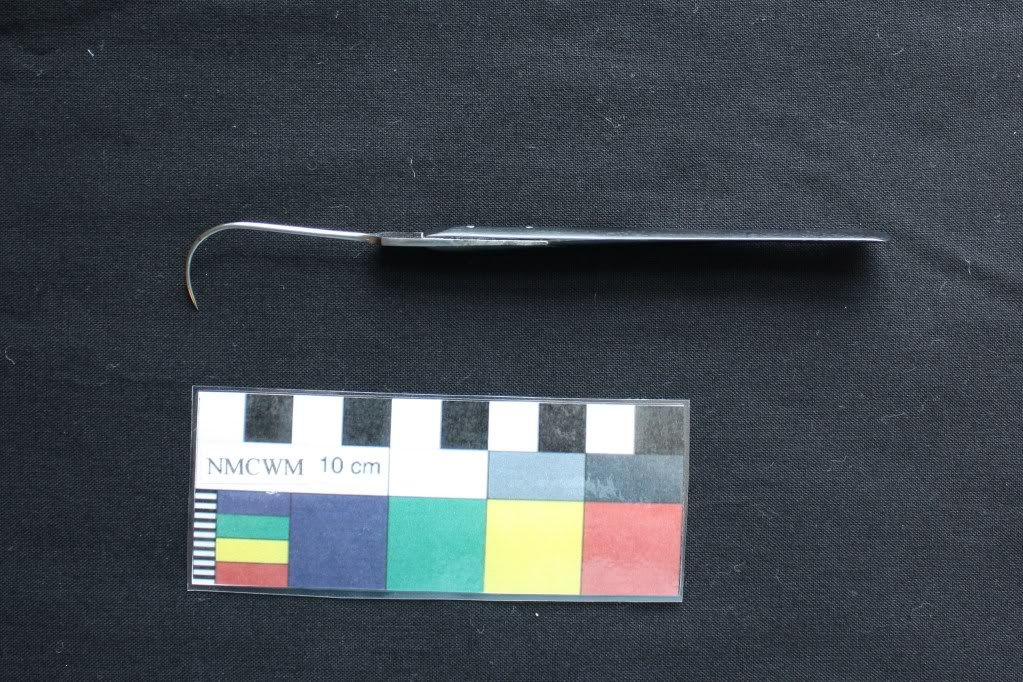
With the amputation completed, the surgeon would use a hooked instrument called a tenaculum to pull out the large blood vessels to be tied off.


Here is a closer view of a tenaculum.


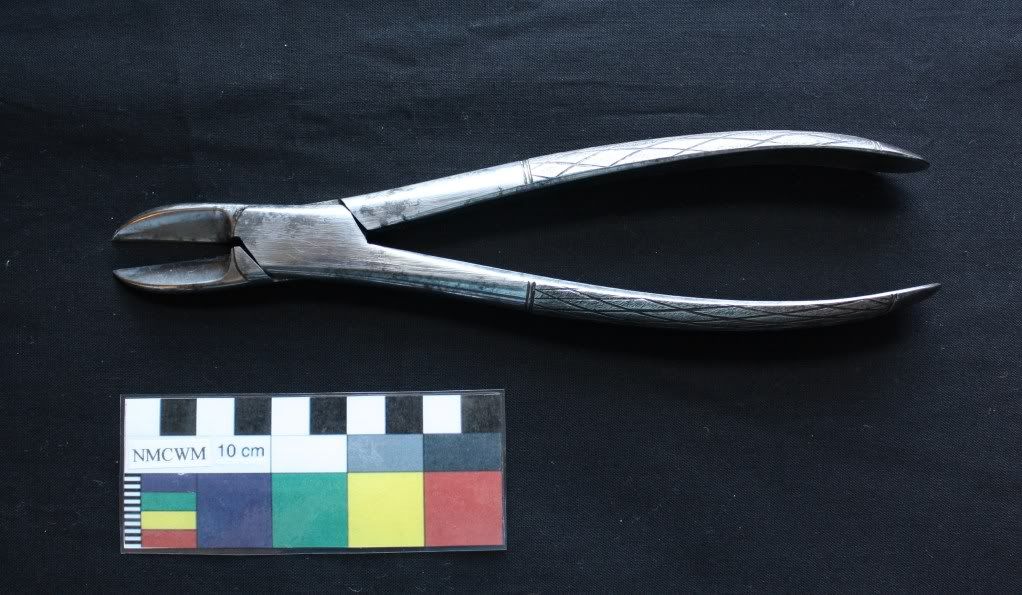
This instrument, called a rongeur, would be used to remove any sharp edges from the bone before closing the wound. A bone file could be used to help smooth the bone too.


And finally, the flaps of skin would be sutured together. Often, an opening would be left to allow the wound to drain. Bandages would be applied to the stump.


Surgical needles haven’t changed much since the Civil War!

 
     To learn more about Civil War amputations click here.
      
     I’ll leave you with a quote from the medical director of the Army of the Potomac, Dr. Jonathan Letterman, who wrote in his report after the battle of Antietam,
“The surgery of these battle-fields has been pronounced butchery. Gross misrepresentations of the conduct of medical officers have been made and scattered broadcast over the country, causing deep and heart-rending anxiety to those who had friends or relatives in the army, who might at any moment require the services of a surgeon.
 It is not to be supposed that there were no incompetent surgeons in the army. It is certainly true that there were; but these sweeping denunciations against a class of men who will favorably compare with the military surgeons of any country, because of the incompetency and short-comings of a few, are wrong, and do injustice to a body of men who have labored faithfully and well.”


Photos courtesy of the National Museum of Civil War Medicine.