Thursday, January 31, 2013

The Civil War Housewife


     "I suppose you all know what a housewife is?  It is a long piece of cloth with a number of small pockets sewed along one side, and made to fold up like a pocket-book, having separate places for buttons, thread, needles, pins, &c., such as some of you may have seen your mothers or grandmothers use."  - The Reformed Presbyterian magazine. Sept. 1, 1864.

     Civil War soldiers did not have many extra items of clothing, so the clothing they wore took a lot of wear and tear.  Soldiers were often sent off to war with “housewives” or small sewing kits made by their wives, mothers, or girlfriends.  These were usually made from scraps of fabric or sometimes leather, and could be folded or rolled to pocket-size, and then fastened with ribbon, yarn, or a button.  They contained essential sewing supplies such as needles, pins, thread, buttons, a small pair of scissors, extra scraps of fabric, and possibly a thimble.  When a soldier needed to sew on a button or mend a tear, all of the necessary supplies would be at hand. 

 
In this image from the Library of Congress titled, “War views. No. 1501, Camp life, Army of the Potomac - writing to friends at home” you can clearly see a soldier in the foreground doing some mending.

 
     Since I work at a museum which focuses on Civil War medicine, we do not own any sewing kits, but we have been able to borrow two for display.  Let’s take a look at them.

 
This sewing kit can be seen in our Everyday Life display, which shows many items which the soldiers would have had with them in camp. It has a leather exterior and cloth interior. As you can see, the only remaining contents are a few pins. It is fairly typical of the sort of housewife which would have been carried by a soldier. This kit is on loan to us from the collection of Dr. Gordon Dammann.


This is a fancier sewing kit made of maroon velvet with an embossed design and metal details. It can be seen in our Nursing display and it belonged to Miss Laura R. Cotton, who was a nurse in Philadelphia. This kit is on loan to us from the collection of Mr. Chris Foard.

 
The interior of the red kit is made of leather, with a cloth flap for the pins and needles, and leather loops to hold the larger sewing tools. 


This tiny bone crochet hook was contained inside the kit. It would not have been a typical item for the housewives that the soldiers carried. 


Most kits did contain a small set of sewing scissors. This is a fairly plain set, but many times these sewing scissors were made in the shape of a stork, with the feet being shaped into the finger loops and the bird’s “beak” forming the blades.


Another item which could be found in a housewife was a thimble. Thimbles were most commonly made of metal or wood. This one is steel with an aluminum lining. It was found at the site of Clara Barton’s Missing Soldiers Office. It required some conservation work and so is not yet on display. This thimble is on loan to us from the U.S. General Services Administration.


     You’ve probably noticed that the supplies contained in a small sewing kit haven’t changed much over the years!  These kits are still fascinating though, and give us a small glimpse into the life of a Civil War soldier.

 
Photos courtesy of the National Museum of Civil War Medicine, except where otherwise noted.

Thursday, January 24, 2013

Civil War Arms of a Different Sort


     It seems appropriate after posting about amputations to post next about some of the prosthetics used by the soldiers after the amputations.  Since I’ve already posted about a prosthetic leg here, I will focus on a prosthetic arm this time.
 
Here is the only prosthetic arm in the museum’s collection. It was manufactured by Marvin Lincoln of Malden, Massachusetts. It is made of maple wood and features a lockable elbow joint, an opposable controlled thumb, a replaceable hand, and ventilation holes for the elbow stump.


     Though prosthetic limbs were around long before the Civil War, the sheer number of amputees produced by the war, coupled with the fact that the Union veterans who were amputees were provided federal government funds to purchase prosthetics, spurred many advances in the field of prosthetics.  (Confederate veterans had to request prosthetics from their home states.)  Marvin Lincoln was one of the manufacturers who supplied these artificial limbs.  An arm like the one pictured above sold for $50, which was also the amount that the government supplied for a veteran to purchase a prosthetic arm.
 

This photo from the Library of Congress shows an unidentified soldier from Company G, 147th New York Infantry Regiment, with two amputated arms. Had he not been fitted for prosthetic arms yet, or did he choose not to wear them for the photo?


This is a copy of Lincoln’s patent for his artificial arm, dated August 11, 1863, which diagrams the parts of his arm. 
 

     In the patent letter which accompanied the above diagram, Lincoln states, “To flex the arm, it is only necessary to give the upper arm a quick jerking motion, which throws up the forearm, causing the latch-spring and catch to operate as to lock it in position.  When thus bent, the arm is generally thrown across and against the breast, assuming then an easy and graceful position, and it may also be used to carry pieces of clothing or other bundles….having in this way a capability not possessed by any other arm now made…. 
I do not give to all the fingers an extended position….but that while making the two forefingers nearly straight, so that they will have the proper position to enable them to act in conjunction with the spring-thumb to hold or firmly grasp any article between them, and I give the outer fingers a hooking form….  This manner of construction enables me to impart to the hand not only a graceful and ornamental form, but to give it also a capacity to carry articles like baskets, bags, &c., by hooking them onto the fingers.”
 
   Let’s take a look at some of the details on this arm.


This view shows what remains of the leather strap which held the arm in place, the elbow joint, and the ventilation holes.


Here is a close-up of the carved hand. Unfortunately, the fingertips have all been broken. Note the details Lincoln included to make the arm look more realistic though – the nail bed on the thumb, and the flesh-colored paint on the arm. The small screw on the wrist was the mechanism used to remove the hand. It could be replaced by a hook or other implement if the wearer desired!
 

This label is located on the back of the forearm and not only identifies the maker of the arm, but also doubles as the button for the locking mechanism for the elbow.
 

     In an advertising pamphlet written by Marvin Lincoln just after the war, his artificial arms are described as being sturdy enough to handle being used in everyday life, while still being “artistic and beautiful” in appearance.  He also claimed that these arms gave their wearers, “the consciousness that what he uses to conceal his loss, and to assist him in his labors and pleasures, is no disgusting appendage, but, on the contrary, is entirely worthy to fill the ‘vacant sleeve.’”

     I tend to believe he hit the mark here!
 

You can read more about Civil War prosthetics here.
 

Photos courtesy of the National Museum of Civil War Medicine, except where otherwise noted.

Thursday, January 17, 2013

Amputation Instruments


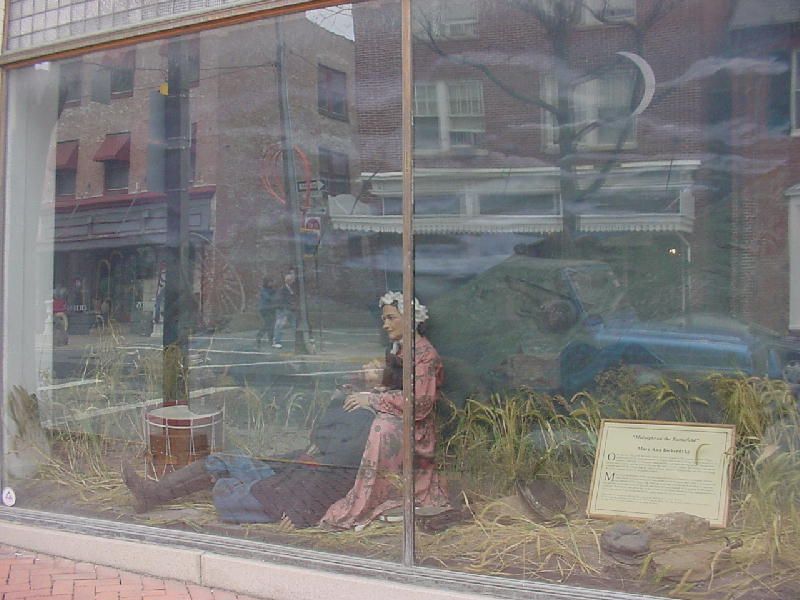
     There’s a story the Director of our museum (George) likes to tell about overhearing two people on the street debating over whether or not to visit the museum.  The wife was looking in the front window and commenting that she’d like to take the tour.  Her husband replied, “Civil War medicine?  It’s just a saw!”  At that point, George stepped up and offered to show them the museum, as well as how much more there was to Civil War medicine than an amputation saw.


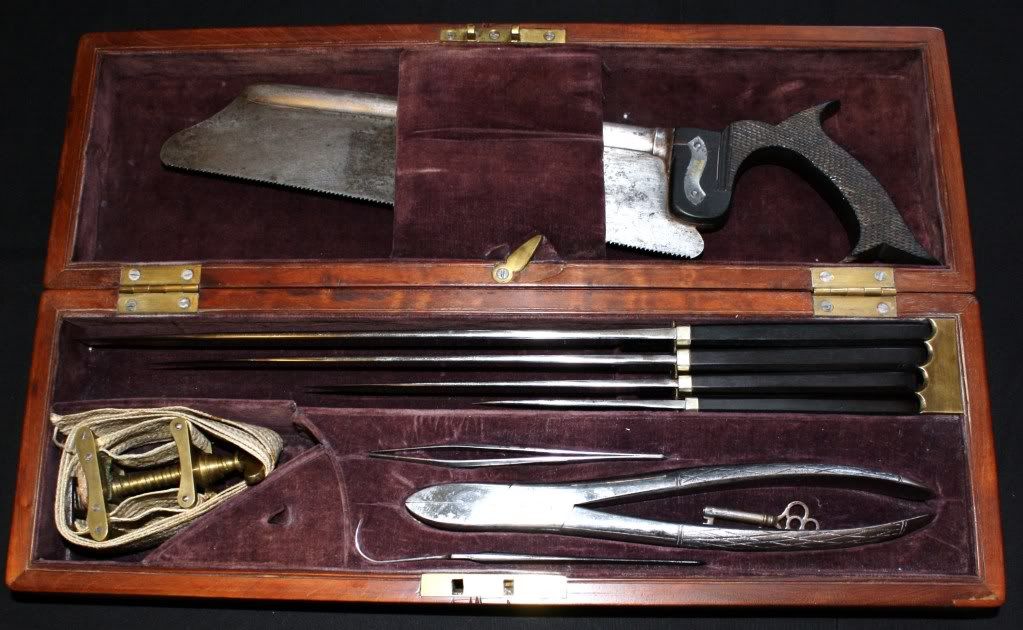
Here is what most people associate with Civil War medicine - an amputation kit. This is a nice example of an amputation kit with a rosewood case and the basic instruments (including the saw!) needed to perform an amputation.  


       Sadly, this has been the image of Civil War medicine for quite some time.  Even during the war, the surgeons were judged to be “butchers” for performing so many amputations.  The image has persisted through the years, and many people still have the idea that Civil War surgeons were heartless and incompetent.  The simple truth is that these surgeons were saving lives in the best way that the knowledge and technology of the time allowed.

     There is no doubt that amputations were a big part of Civil War medicine though. So, let’s take a look at some of the instruments that were used.
 
 
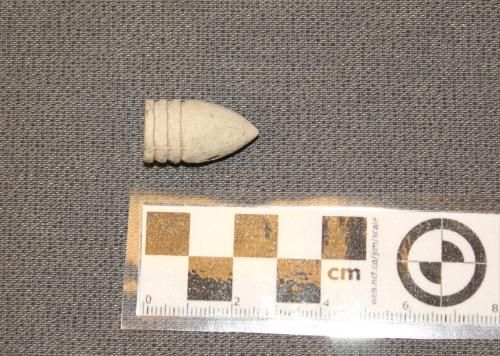
This is the culprit responsible for the necessity of so many amputations - the Minié ball. These bullets caused tremendous damage to soft tissue and to bones. One medical textbook of the time describes the damage as
“….truly terrible; bones are ground almost to powder, muscles, ligaments, and tendons torn away, and parts otherwise so mutilated, that loss of life, certainly of limb, is almost an inevitable consequence.”
 

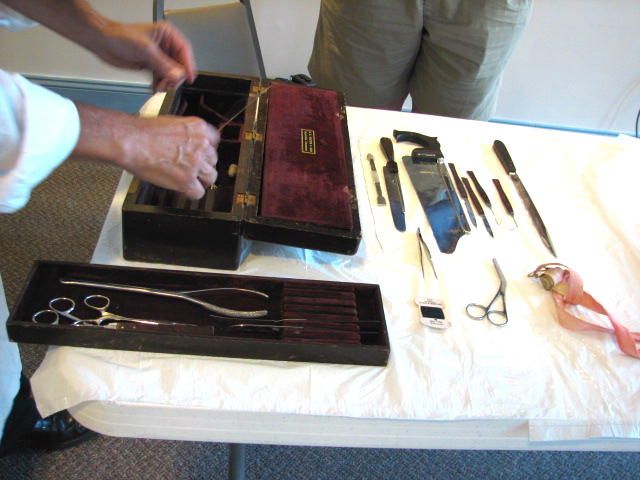
One of our volunteers is a present-day surgeon, even though he dresses as a Civil War surgeon at the museum! He took our Director, George, through the amputation process, using a pig leg. 
Don’t worry; even though those instruments look old, they are actually reproductions of Civil War instruments. I wouldn’t let them use the real ones! 


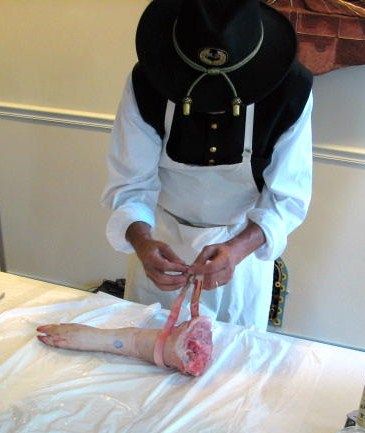
Normally the first step in an amputation was to anesthetize the patient, but obviously that was unnecessary for this“patient.” The next step would be to apply a tourniquet to the limb above the wound, to stop or slow the bleeding.


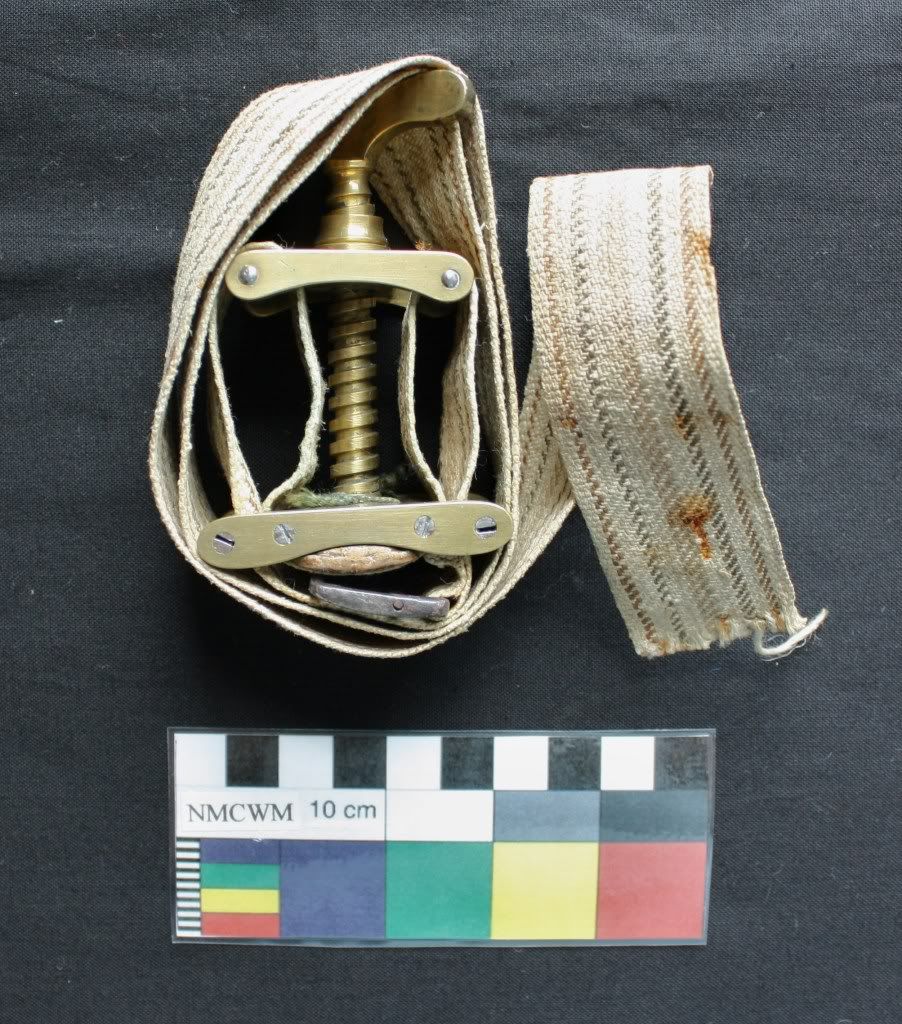
Here is an example of a Petit’s screw tourniquet, which would have been used in the Civil War.


     There were two main methods of amputation used in the Civil War.  The flap method left flaps of skin and muscle which would be used to cover the stump at the completion of the operation.  A V-shaped cut would be made, and then the bone would cut away a few inches above the flaps.  In a circular amputation, the surgeon basically cut in a circle around the limb, would draw back the skin slightly and then cut straight across the bone. 

 
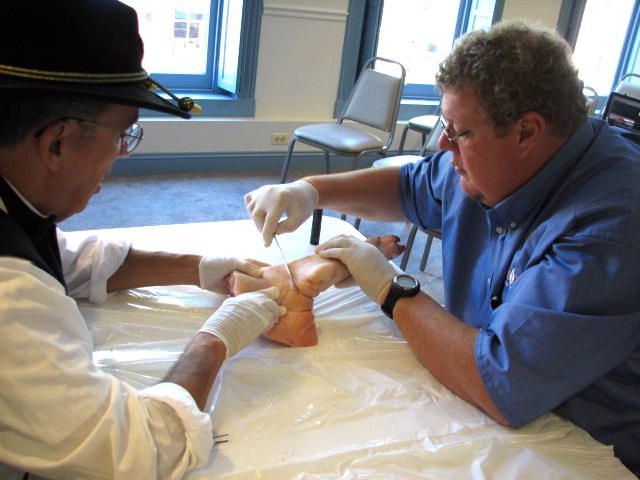
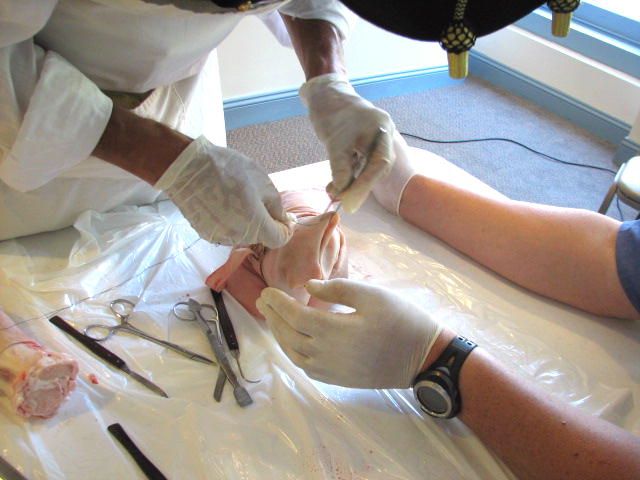
George uses an amputation knife to make the first incision through the skin and muscle. Afterwards, the skin and muscle will be pulled back slightly from the bone. 
 I will point out here that Civil War surgeons did not wear gloves.

 
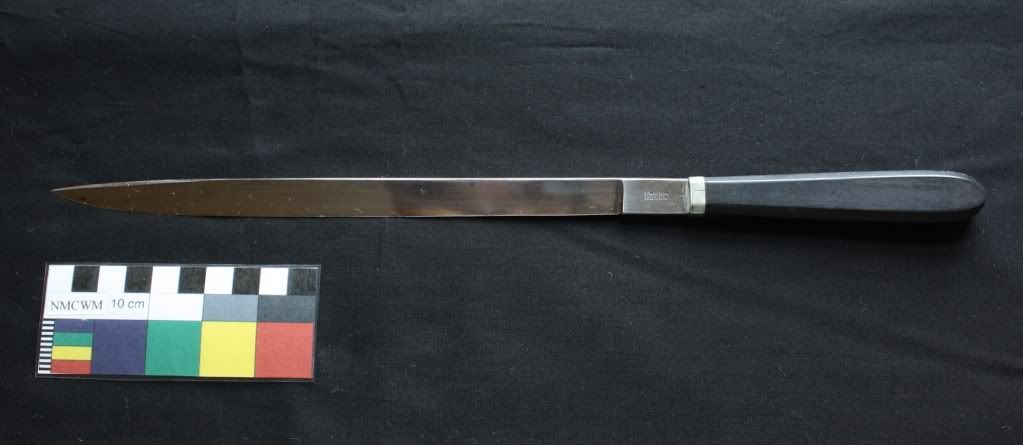
This amputation knife is similar to the one being used in the photo above. Single-edged amputation knives were used for circular amputations.

 
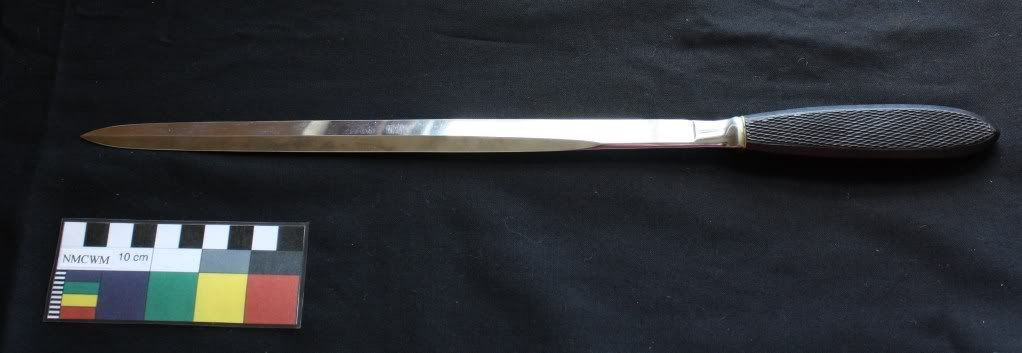
This double-edged amputation knife is called a catlin. It was more commonly used in flap amputations.


The amputation saw was used just to cut through the bone.


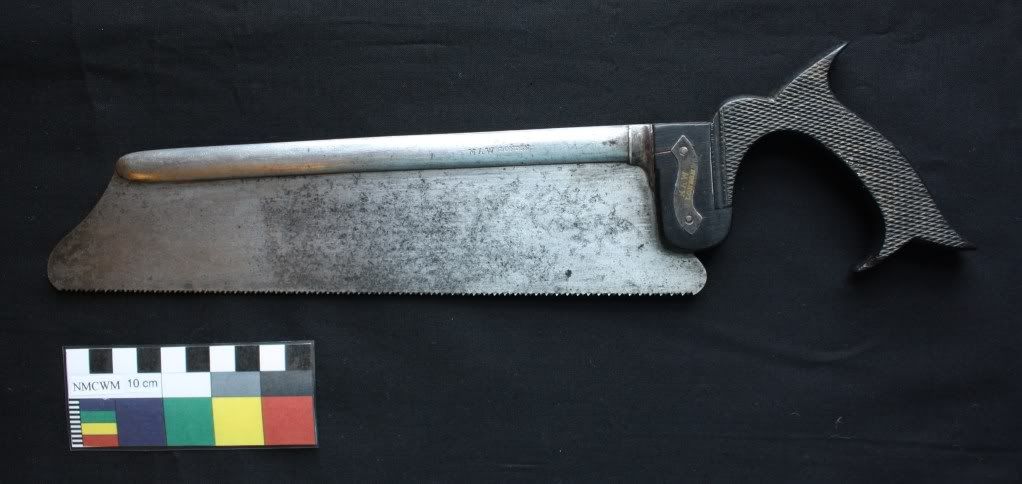
This is a typical amputation saw with a “fishtail” handle. The checkered texture on the handle gave the user a better grip. Operating quickly was important. There was less chance of shock to the patient, and it allowed the surgeon to move on to the next patient quickly. Most amputations were done in less than ten minutes!


With the amputation completed, the surgeon would use a hooked instrument called a tenaculum to pull out the large blood vessels to be tied off.


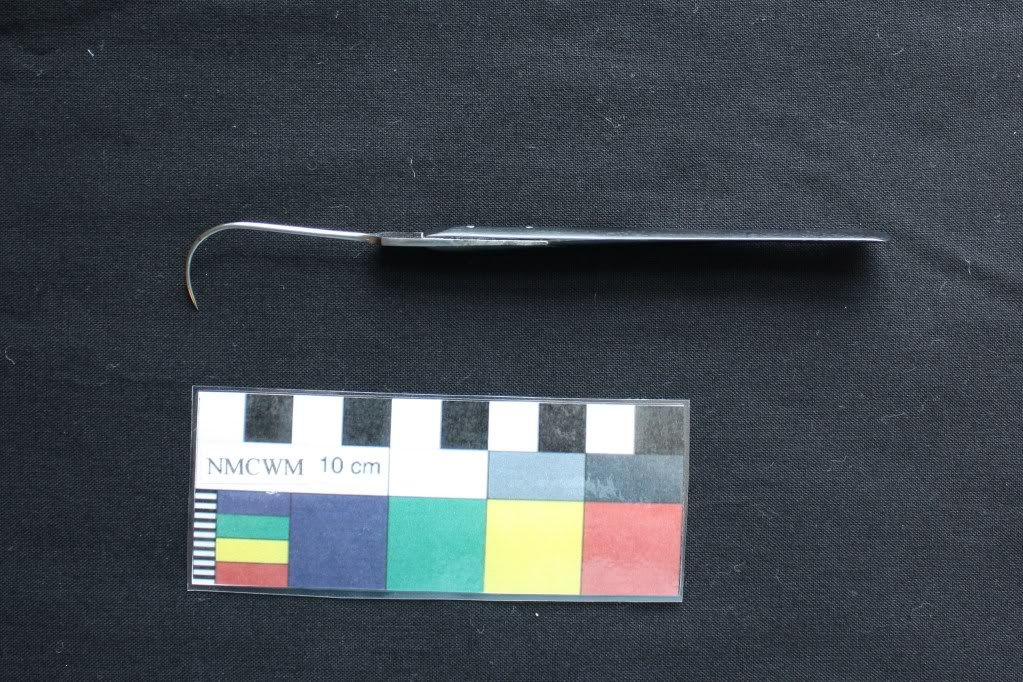
Here is a closer view of a tenaculum.


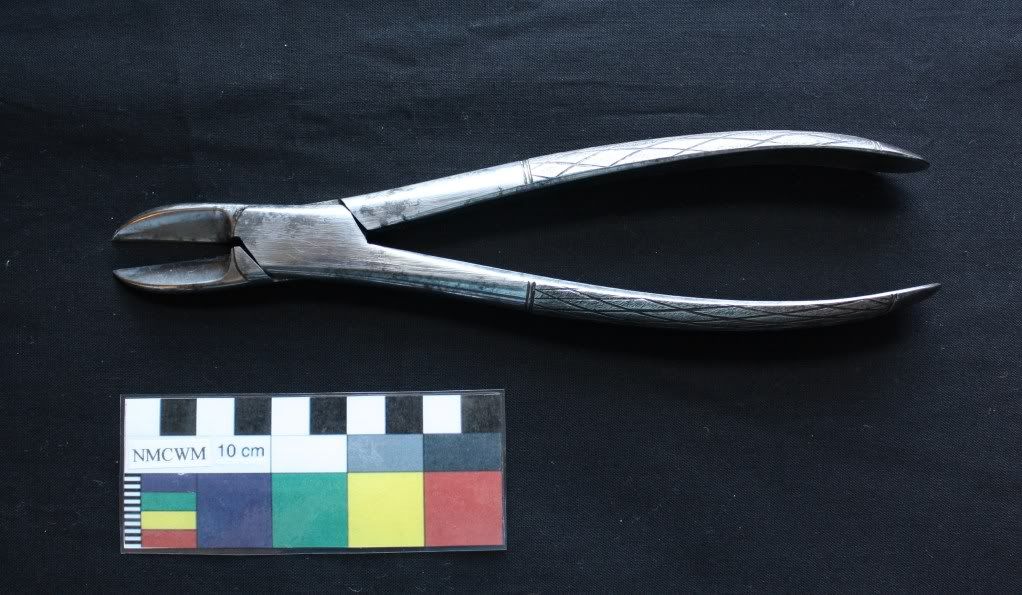
This instrument, called a rongeur, would be used to remove any sharp edges from the bone before closing the wound. A bone file could be used to help smooth the bone too.


And finally, the flaps of skin would be sutured together. Often, an opening would be left to allow the wound to drain. Bandages would be applied to the stump.


Surgical needles haven’t changed much since the Civil War!

 
     To learn more about Civil War amputations click here.
      
     I’ll leave you with a quote from the medical director of the Army of the Potomac, Dr. Jonathan Letterman, who wrote in his report after the battle of Antietam,
“The surgery of these battle-fields has been pronounced butchery. Gross misrepresentations of the conduct of medical officers have been made and scattered broadcast over the country, causing deep and heart-rending anxiety to those who had friends or relatives in the army, who might at any moment require the services of a surgeon.
 It is not to be supposed that there were no incompetent surgeons in the army. It is certainly true that there were; but these sweeping denunciations against a class of men who will favorably compare with the military surgeons of any country, because of the incompetency and short-comings of a few, are wrong, and do injustice to a body of men who have labored faithfully and well.”


Photos courtesy of the National Museum of Civil War Medicine.

Thursday, January 10, 2013

Sprucing Up a Museum


     Once a year, usually at the beginning of January, my museum closes for several days to allow for a thorough cleaning of the museum, as well as the completion of some projects which are best done when the building is clear of visitors.  Though many of the jobs are not very glamorous, they are necessary to keep the museum in shape for visitors and for the staff.  It is at least a good excuse for dressing down for work! 

     Let’s take a look at some of what was done last week.

 
One of the big projects facing us is changing our front window display. It has had the same scene depicting Mary Ann “Mother” Bickerdyke tending to a wounded soldier on the battlefield for over 10 years. This scene was inspired by the illustration “Midnight on the Battle Field” by J.J. Cade which is captioned, “It was Mother Bickerdyke, with a lantern still groping among the dead. Stooping down and turning their cold faces towards her, she scrutinized them searchingly, uneasy lest some might be left to die uncared for. She could not rest while she thought any were overlooked who were yet living.”


Before we can construct a new display, the old one has to be taken out. I wonder if Tom or Katie ever thought that carrying mannequins would be part of their job descriptions?


There’s always time to have a little fun on the job - I just hope I don’t see my next paycheck signed by Mother Bickerdyke!


     As with most big projects, there was an unwelcome surprise though.  When the mannequins were inspected more closely, it was discovered that there were insects and insect damage on the clothes.  It was a full “Red Alert” moment for me!  The clothes were immediately taken off and sealed in plastic bags, samples of the insects were sealed in smaller plastic bags, the mannequins were thoroughly vacuumed, and the exterminator was called.  Fortunately, the insects were contained to the display window; no evidence of them was found in any of the galleries or the collection room.


Once the mannequins had been treated, they were re-dressed and used out at the Pry House. Mother Bickerdyke is now Mrs. Richardson, and the wounded soldier has gotten a promotion to become a wounded General Richardson.
  

     We’re still working on the new front window display.  You’ll have to check back for reports on our progress!

     My biggest project was the installation of two new displays.  You can see the new Clara Barton exhibit in last week’s post.  I also switched our Civil War Sesquicentennial display in the front lobby from the Battle of Antietam to the Battle of Gettysburg.


The new Gettysburg display contains a glass plate negative and photograph of a wounded color bearer, a medical case identified to a hospital steward, a tooth powder container, a portrait of a nurse, and a map of Gettysburg which shows the field hospitals.


     Another museum project was to replace the carpet in our second floor lobby.  As you can see in the following photos, it was not a fun job!
 

Katie pulled out the old carpet squares.
 

April and Tom installed the new squares.


     There were plenty of other “dirty jobs” too.


Karen collected all the recycling.


The museum store needed to be cleaned and reorganized.


Adele tackled the job of dusting the galleries.


Kyle mopped the stairwell.


Audrey cleaned the carpet in our conference room.


And of course, there are always light bulbs that need to be replaced!
 

     It takes a lot of hard work on the part of the museum staff and volunteers, but the results are worth it.  The museum is ready to handle another year of visitors! 
    

 Photos courtesy of the National Museum of Civil War Medicine.

Thursday, January 3, 2013

Clara Barton’s Missing Soldiers Office Exhibit


     It’s been a while since I updated the progress on the Clara Barton’s Missing Soldiers Office.  You may recall from my previous posts that the National Museum of Civil War Medicine recently partnered with the U.S. General Services Administration to create this new museum in the space where the Missing Soldiers Office was once housed.  The artifacts discovered in this building, which are owned by the GSA, are associated with Clara Barton and Edward Shaw, her landlord and friend.  A number of these artifacts will be displayed at the new museum on 7th Street in Washington, D.C.
     Restoration work on the space started in 2012.  A welcome center will be opened on the first floor of the building, and the third floor, where Clara lived and worked, will be devoted to the interpretive exhibits.  It is projected to be open by the end of this year.

     In the meantime, some of the artifacts have been borrowed from the GSA so that we could create a display of some of Clara Barton’s items here at the NMCWM.  It has taken quite a bit of work, but I was finally able to install the new exhibit this week.  I’m sure all you Clara Barton fans are eager to take a look!
 
 
Of course the old exhibit had to be taken out first! Alison was a big help in moving the artifacts.


The case is kind of bare now, but it won’t stay that way for long!


First the panels have to be put on the walls. If a panel falls or a nail drops, I don’t want any of the artifacts involved! Here, Kyle helps me to mark where the panels will be placed.


Got it on the first try!


The labels for the artifacts are added last.


     Now let’s take a closer look at some of the artifacts on display.


Most mid-nineteenth century medicines were shipped and stored in glass bottles such as these. The bottle on the left retains a partial paper label which reads, "Antimon... John... Corner of E... Wash..." It contained antimony, a toxic element that was used as an emetic (to cause vomiting) during the Civil War.


This salt bag is representative of the supplies that Clara Barton collected and took to the soldiers at the front. Salt was used to season and preserve food. 


Here are just a few of the socks and sock tops which were found in the building. If the bottom of a sock was worn out or damaged, the top could be removed and a new bottom knitted to it. Refurbished socks could be sent to soldiers in need, and the soldiers were often in need of socks! Note the blood stains on the sock in front.


Two of the metal signs which Clara Barton used at the Missing Soldiers Office.
 
 
And here is the finished display. 
I can't help but hope that Clara would be pleased with it!
 
 
     More information about the Clara Barton Missing Soldiers Office Museum can be found at http://www.civilwarmed.org/clara-bartons-missing-soldiers-office-museum/about-clara-bartons-missing-soldiers-office/


Photos courtesy of the National Museum of Civil War Medicine.