Thursday, March 28, 2013

Strange Things You See at Museums!


     With April Fool’s Day coming up, I thought it would be a good time to look at the some of the strange and humorous parts of museum work.  Though my coworkers and I take our jobs seriously, there are moments when we get to laugh at ourselves.

     Mannequins provide good opportunities for interesting photos.
 
The mannequins and their clothes do have to be vacuumed regularly, even if it does look a bit strange.
 
     You never know just where a mannequin might turn up….


They can appear at someone’s desk….


….or in someone’s office.
 
     Sometimes, only parts of the mannequins show up in strange places.


They have to be stored somewhere!


     The museum’s dogs are often in on the fun too.


When we received the mummified arm, my coworkers set up this scene for me!


But you can see who really runs this place!


     Sometimes we just get caught being silly.
 
Our Director demonstrates the museum’s dental plan on the Deputy Director!
 

     Living History events and Civil War costumes can provide some interesting images.
 
One of these things is not like the others….
 

Yes, that is a cannon in front of the museum. Does it bother anyone else that it is pointed right at that child?!

 
Comparing the old versus the new can make for some interesting photos.


     Catching anachronisms can be entertaining as well.


I don’t think porta-potties were designed with hoop skirts in mind!
 

If they’d had them, they’d have used them!
 

     Halloween is always fun around here!


This was “Private Pumpkinhead”, our entry in the local pumpkin decoration contest. I can’t believe we didn’t win!
 

     In this field, good acting skills never hurt.


Kyle helps out in an amputation demonstration.
 

     Sometimes, we have some fun with the exhibits – as long as there are no artifacts involved of course!


Tom gives some advice in our amputation scene.
 

The doctor doing Sick Call gets a couple of extra patients.
 

     Just realize that your coworkers are good at catching moments you don’t necessarily want on film!


If you take a nap, they will take a picture!

 
Insect repellent doesn’t smell very good to people either!


     It seems that our visitors participate in the silliness sometimes too.


We were surprised to find one of our museum maps inside a local newspaper box one day! 
 

     It’s certainly never dull around here!


Photos courtesy of the National Museum of Civil War Medicine.

Thursday, March 21, 2013

A Patent Model


     It’s about time to find something interesting from the collection room again!

     Let’s take a look at a patent model of a mattress.  Due to the large number of sick and wounded soldiers in the Civil War, demand for hospital beds and mattresses increased.  Usually where there is demand, there are people willing to produce the supplies for it, and this leads us to today’s artifact.
 
Here is a diagram of the mattress which was part of the patent application for a new kind of mattress stuffing, invented by A.C. Crondal of New York. 


     At the time of the Civil War, applications for patents were required to be accompanied by a sample, usually a small working model, of the item.  Over time this became problematic for the government, as all the patent models submitted to them took up a lot of storage space!  The requirement for these models was eventually dropped.  Now, though, these patent models are in demand as collectibles.
 
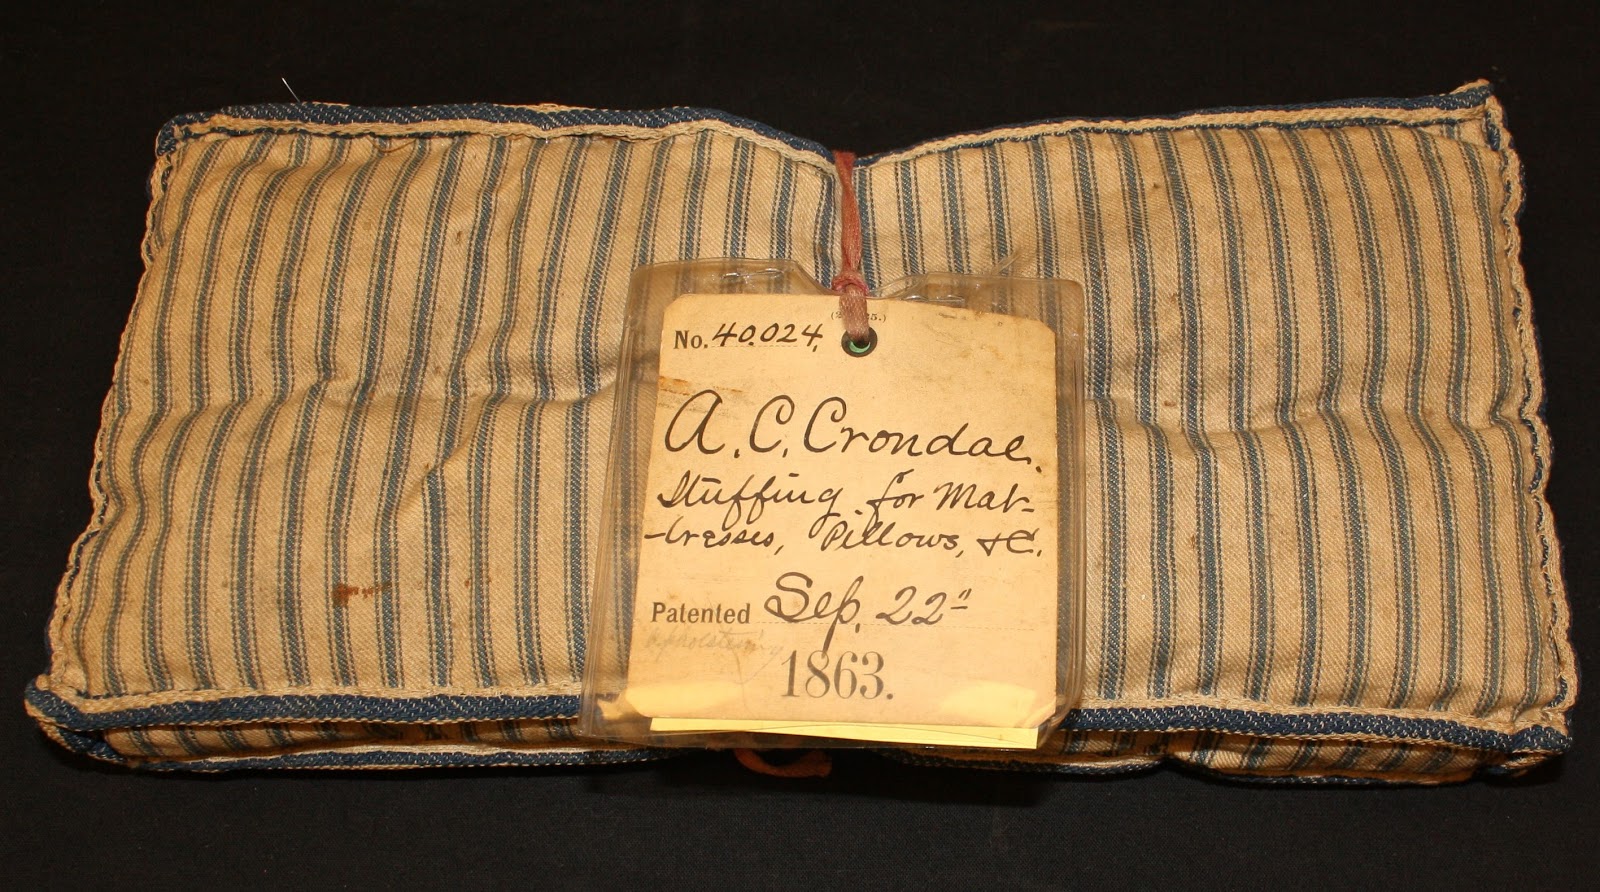
This is the patent model submitted by A.C. Crondal. It measures just 11 ½ inches long and 5 inches high. Notice that the original patent office label is still attached to it which indicates that Mr. Crondal’s patent was granted on September 22, 1863 and was patent number 40,024.
 

     Also notice in the photograph above that the patent office label is attached to the model with a piece of red ribbon, also referred to as tape.  This tape is the origin of the of the expression “red tape” which is often associated with government bureaucracy!

     A letter was also a required part of the patent application.  The one for this mattress sample starts:

"Be it known that I, A.C. Crondal, of the city, county, and State of New York have invented a new and Improved Cork Stuffing for Mattresses, Pillows, &c.; and I do hereby declare that the following is a full, clear, and exact description of the same, reference being had to the accompany drawings, forming a part of this specification...."

          He proceeds to describe the methods he used to grind and sift the cork granules, the manner in which the linseed oil was applied to the granules, and how these granules could be used. 

“For mattresses and similar articles - such as the seats and backs of sofas, chairs, &c. - I use the coarse granules, and the fine granules I apply for stuffing pillows and all classes of soft cushions."

The bottle contains a sample of the oiled cork stuffing Mr. Crondal wanted to patent, and was submitted to the patent office along with the model of the mattress. 

 
     He then goes on to describe why his invention would be good for use in hospitals and ambulances:

"By these means I have succeeded to render the use of cork; practicable for stuffing mattresses, &c., being without doubt the healthiest material for upholstering, because it does not attract or absorb moisture, it does not suffer vermin, and it is cool and elastic.  A mattress stuffed with cork, according to my method, therefore is of the greatest advantage for patients in hospitals and ambulances, and for sick persons in general, and there is no danger of the destruction of the cellular texture of the skin or mortification usually arising from the secretions passing into the mattress and rendering the same moist, hard, and uneven.  The cork prepared according to my invention remains dry and even, and patients lying on one of my mattresses have never to be moved out of bed.

By reason of its lightness, cheapness, and portability my mattress is also of great advantage on board of vessels, and in this case it may serve at the same time as a life preserver."

     The following year, Mr. Crondal applied for a patent of a folding bedstead, which can be seen here.  I suspect that he intended for his mattresses to be used on these beds!


Photos courtesy of the National Museum of Civil War Medicine.

Thursday, March 14, 2013

Photographing Artifacts


     Part of keeping records on museum artifacts involves documenting them with photographs.  Photos help to provide a record of an artifact’s condition, as well as a means of identification.  So, a good curator or collection manager needs a basic knowledge of photography.  Photography has been sort of a hobby of mine since high school, plus I was fortunate enough to have once had an intern who was a photography student.  So, while I’m not a professional photographer, I can at least get some decent artifact photos!
 
Here is a fairly typical artifact photo from my museum’s data base. It shows three musket balls against a black background, with a photographic reference scale. The scale helps to show the artifact’s size and color. 
The background is a black cloth. Paper can be used as well, as long as it is acid-free to protect the artifact.
 

I prefer to use a black background in most of my photos. Here it provides a nice contrast to this light-colored Morning Report.
 

Glass artifacts, especially clear glass ones, can be tricky to photograph! They tend to either blend into the background, or to reflect too much light which obscures the details. You can see in this shot of a glass eye cup that there is some reflection, but that the details (including the small chip in the glass) are still visible. I just won’t tell you how many shots it took me to get this one!
 

Sometimes I need to use different colored backgrounds. The black case for this portrait would have disappeared against a black background. These are supposed to be documentary photos and not “artsy” ones, so it’s best to stay with neutral colors like this gray. 
 

White can be a good background color as well. These Civil War field glasses show up well against this background.
 

I have to get more creative with the larger artifacts. I didn’t have a background cloth large enough for this flag, so I used something else I had on hand – acid-free white tissue paper.
 

     Sometimes though, I do have to leave the photographs to the professionals.  The NMCWM was recently contacted by National Geographic about getting photos of a few of our artifacts for an article they will be doing on Civil War medicine.  They sent one of their photographers to take the photos, but of course I was there to handle the artifacts.


Here’s the National Geographic photographer setting up for the photo shoot. I have to admit, that’s quite a camera! At 80 megapixels it makes my 10 megapixel museum camera look pretty puny.


 She had quite a bit of equipment to set up before she could photograph any of the artifacts.
 

My job of positioning the artifact was pretty simple by comparison!
 

I can’t wait to see how these shots look when they are published!


 Photos courtesy of the National Museum of Civil War Medicine.

Thursday, March 7, 2013

A Fake Pharmacy


     Normally when I put together an exhibit I work with artifacts which go inside the display cases, and reproductions of artifacts for what we call the immersion displays.  Usually the reproduction items are things like uniforms for the mannequins, Civil War period furniture, and surgical kits and instruments which can be purchased from various sources, or donated by generous museum patrons!  Sometimes though, I have to get creative and make them myself.

     Recently, it was decided that we needed to upgrade a portion of our Pavilion Hospital gallery.  This gallery depicts part of a fixed-bed hospital, complete with hospital beds, patients, a Sisters of Charity nurse, a surgeon, and a hospital steward.
 
Here’s the hospital steward reaching into the pharmacy cabinet in the Pavilion Hospital gallery. The medicine bottles and labels needed to be changed so that they were more correct for the period being portrayed.


     First, some appropriate bottles were purchased, and then I had to work on creating the labels and the contents.
 
The labels which came on the bottles were not appropriate for our needs, so I first worked on removing them. I succeeded in scraping off one before I decided it would make more sense to simply turn them around and put the correct labels on the other side!
 

     The labels were easy, since our Education Department had already reproduced some labels from Civil War medical bottles to use with some of their props.
 
Here are some of the reproduction labels on some of the bottles and a tin.
 

For comparison, this is one of the original labels on an original medical bottle. 


     The more difficult task was reproducing the contents of the medicine bottles.  I obviously couldn’t use real drugs!  I also couldn’t use any materials which could cause damage to the exhibit if they spilled, or which could attract insects. 

     I tackled the powders first.  Baking soda worked for most of them, and was fairly easily dyed various colors using food coloring.  I would put the baking soda into a sealable plastic bag, add the food coloring, and knead the bag until the color was uniformly distributed.  Tartar emetic can be simulated using plain baking soda, and potassium iodide can be simulated using baking soda tinted with some red food coloring.

     Crystals were mimicked using salt.  I used rock salt for the larger crystals, and table salt for the small crystals.  I found that the table salt could be colored in the same manner as the baking powder.  Rock salt can be used to simulate silver nitrate, while table salt can be used for sugar.

     For the pills, I found that white air-dry clay worked the best.  The clay was reasonably easy to handle, could also be colored with food coloring, and I didn’t have to deal with baking it.  I have to admit that I felt a little silly sitting in my office rolling out little balls of clay though!  White pills were used to simulate ipecac and cathartic pills.  Blue pills were used for “blue mass” or mercury pills. 
 
Here is my first batch of fake pills!
  
 
     The liquids were the hardest to simulate.  I did not want any actual liquids in the display, since there would be too much chance of them leaking or being spilled.  I ended up using a clear two-step resin to simulate liquids in the bottles.  I used a clear resin to simulate alcohol and a darker one to simulate iodine. 
 
I did have to take this one to my work room, as it required more ventilation. 
 

The resin worked well, and the labels seen on the backs of the bottles won’t be visible once I put labels on the fronts.
 
And, here are some of the finished bottles. You can see that I was able to use one real ingredient – the coffee!


     So, now our pharmacy cabinet has a much more accurate appearance.  Just don’t try to sample any of the medicines! 


Photos courtesy of the National Museum of Civil War Medicine.