Thursday, December 22, 2011

Moving Artifacts


The Pry House, built in 1844, was originally owned by Philip Pry. It now has the distinction of being known as the birthplace of military and emergency medicine because of the plans developed there by Medical Director Dr. Jonathan Letterman.

     Last Friday I was out at the Pry House Field Hospital and Museum, the National Museum of Civil War Medicine’s satellite location out on the Antietam Battlefield.  In 1862, just prior to the Battle of Antietam, the house was commandeered by General George McClellan for use as his headquarters.  Major General Joseph Hooker and General Israel Richardson were treated there after the battle for wounds they received.  General Hooker recovered, but General Richardson died in the house two months later.  His death there resulted in some interesting ghost stories about the house, but I’ll have to save those for a later post!

Here is our operating theater display in the Pry House, depicting Major General Joseph Hooker being treated in one of the first floor rooms. The operating “table” here is a door placed on top of stacked crates. 

The Pry barn was used as a Field Hospital. If you were not a General, this was where you would be treated! Over 400 men were cared for here.
   

     The Pry House closes over the winter, and so the reason for my being there last week was to move the artifacts on display there back to the main museum.  As you might imagine, moving artifacts requires planning, some care, and lots of packing materials!

Here are some of the supplies I use when packing and transporting the artifacts. The sturdy, waterproof containers are padded with ethafoam and acid-free tissue. The cotton gloves are used when handling the artifacts.

     Moving and wrapping artifacts is a methodical process.  This is not an instance when you want to rush!  Each item is wrapped individually.  The larger and studier items, like a cannonball, may only need to be wrapped in some acid-free tissue.  Smaller items or fragile items, like a glass syringe, are also wrapped in ethafoam and packed in smaller boxes for protection. 


Very small items like this bullet are first put into a sealed, labeled bag. It will then be placed into a small box so that it doesn’t get lost in the packing materials!


     When a packing box is filed, all the empty spaces are then filled with more tissue and foam to prevent the items from shifting during transport.  Lids are secured on the boxes to keep everything in place, to protect the packed items from the weather, and to buffer them from the change in environmental conditions as they are taken outside (remember last week’s post on the dangers of rapidly fluctuating temperatures and RH?).


Here’s an amputation kit on display at the Pry House. My first task will be to put the instruments back into their padded compartments inside the case, and to add more padding as needed to keep them in place.


Here’s the amputation kit with the instruments safely stored inside.


Here’s the amputation kit under several layers of tissue and ethafoam!


     When the artifacts arrive back at the museum, they are kept inside the closed containers for at least 24 hours.  This allows them to acclimate to the new environmental conditions gradually.  Then they are carefully unpacked, inspected for any damage, and monitored for a month before being transferred back to their storage places in the collection room.  If any conservation work is required on them, this is the time it is done!  In the spring, they will be packed again and taken back out to their display cases at the Pry House.

     If you’re ever in the area, please stop by and visit!

If you’re lucky, our unofficial mascot, Lacy, will be there to greet you!

Photos courtesy of the National Museum of Civil War Medicine

*Note:  Due to the holidays, there will be no blog post next week.  Happy New Year everyone, and thanks for reading my blog!

Thursday, December 15, 2011

Field Trip


     Field trips to other museums are always interesting!  Museums often cooperate with each other - artifacts or traveling exhibits are often loaned to and borrowed from other institutions; artifacts can be donated, traded, or sold; research and information can be shared; and partnerships can be formed.  Cooperation between museums benefits everyone.  The institutions involved gain knowledge and can present better exhibits, and visitors can see artifacts they may not have gotten to otherwise.   

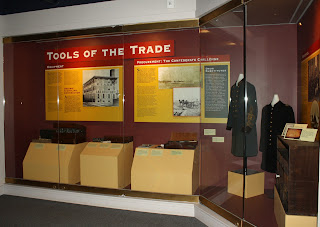
Our “Tools of the Trade” exhibit compares and contrasts equipment and supplies used by Confederate and Union doctors. We didn’t have quite enough Confederate items to display, so some of the items here are on loan to us from the Museum of the Confederacy in Richmond, Va. 

This is one of our artifacts, a wooden prosthetic leg which we have out on loan to the Virginia Historical Society.   It is currently part of their traveling exhibit, “An American Turning Point: The Civil War in Virginia.”


     Sometimes too, museums give away useful museum items!  Last Friday, Tom, Kyle, and I went to visit the National Building Museum in Washington D.C. to look at some exhibit cases which they no longer needed and were willing to donate to a nonprofit organization.  Museum quality exhibit cases are not cheap, so we were thrilled that they were offered to us!  And they seemed happy to be clearing some space for one of their new exhibits.  

I was like a kid in a candy store here, looking over all the available exhibit cases! 
Photo courtesy of Tom Frezza.
   

     You might not think there was any connection between a Civil War Medicine Museum and a Building Museum.  However, the National Building Museum is housed in the former U.S. Pension Bureau, which was built shortly after the Civil War.  It even features a terra cotta frieze on the exterior of the building, which depicts Union Army and Navy troops.  We spent a few minutes admiring it before we went inside!

Photo of terra cotta frieze on the National Building Museum found at http://www.nbm.org/about-us/about-the-museum/civil-war-anniversary.html.


     We thoroughly enjoyed our visit, though I do have to admit that I was a bit envious of all the gallery space and storage space they have!  We didn’t get to tour the whole museum while we were there, but we hope to do that when we go back to pick up the cases.

     It appears that Christmas came early for the NMCWM this year – thank you National Building Museum!


Except where otherwise indicated, photos are courtesy of the National Museum of Civil War Medicine.

Thursday, December 8, 2011

Environmental Concerns


     When considering museum fields, most people tend to think of art and history.  Would it surprise you to learn that when working with artifacts a background in science is also necessary? 

     I posted earlier about monitoring for insects at the museum to prevent damage to the artifacts.  The temperature and relative humidity (RH) of the environment must also be monitored.  Temperature and RH are considered together since they are directly related; as the temperature increases the RH decreases, and as the temperature decreases the RH increases.

     Why is this important in protecting artifacts, you ask?  Changes in temperature and RH can affect materials in several different ways.  Most materials expand when they are heated and contract when they are cooled.  Heating or cooling an object to extreme temperatures, or subjecting an object to constantly changing temperatures can cause mechanical damage, like cracking, splitting, or warping.  In addition, organic materials like wood, bone, and paper expand in high RH and contract in low RH, which can cause similar mechanical damages.  The issues can be compounded if an artifact is composed of more than one material, since different materials can expand and contract at different rates.


This medical chest lid is made of wood which is reinforced with metal edges. The crack in the wood could be the result of the wood becoming too dry, or of being in an environment which fluctuated. Wood can absorb more moisture than metal, so the crack could be the result of the wood trying to expand further than the metal would allow.   
     

     Changes in temperature and RH can also affect the chemical reactions which cause materials to degrade.  If you ever took a class in chemistry, you should remember that heat speeds the rate of chemical reactions.  Or if you cook, you know that heating a liquid allows substances to be dissolved in it much more quickly!  Water (or a high RH) is also necessary for certain reactions to take place, as in the corrosion of metal.  Other chemical reactions can cause paper to yellow, glass to cloud, and dyes to fade.

This iron pestle exhibits some pitting and spots of rust, resulting from being in an environment with a too high RH.  


     Mold is another danger to artifacts.  Mold spores are in the air all around us, and can grow quickly in a warm, moist environment.  It’s nearly impossible to eliminate the spores from the air, but mold growth can be prevented by keeping the RH below 65%.

This is a small piece of chamois leather with two surgical needles. Notice that the metal needles are rusty and that there is evidence of mold on the corners of the leather. It is a good illustration of the effects of a high RH on an inorganic material (needles) and an organic one (leather).

     At the NMCWM we have small digital thermo-hygrometers for monitoring our exhibit cases.  They measure the temperature and RH and record the high and low points during a set time period.  They also have a display so that the temperature and RH can be checked at a glance. 

The thermo-hygrometer is on the side wall of this exhibit. It is easily visible to me when I need to check the environmental conditions, yet it doesn’t interfere with the display. Most visitors don’t even notice it.


     We also have data loggers placed in the galleries.  They measure the temperature and RH every hour and save the data.  I download them to my computer on a monthly basis, and review them to identify any problem areas.

The data loggers are mounted inside small locked, ventilated Plexiglas cases. Ideally, they should be located on an interior wall near the center of the room, and away from any vents.

Here’s a printout from one of the data loggers (click on photo for larger version). You can clearly see which day our air conditioning unit broke! Notice that as the temperature rose, the RH dropped.

     
It’s one more way I help to preserve and protect the artifacts, and earn my Guardian title!


Photos courtesy of the National Museum of Civil War Medicine.

Thursday, December 1, 2011

Be Thankful

     Since we just celebrated Thanksgiving, the subject of being thankful seems appropriate.  For me, that brings to mind the dental exhibit at the NMCWM.  One look at the dental tools used in the mid-1800s should make anyone thankful that they live today!

These are tooth keys – early tooth extraction devices.  The dentist would
use a twisting and pulling motion to remove a tooth with one of these. 
Are you cringing yet?

Dental forceps replaced tooth keys.  They made tooth extraction somewhat
easier as they were used in a grasping and pulling motion. 


     When the Civil War started, the dental profession was still fairly new, as well as being rather expensive for the average citizen.  Most people only visited a dentist if they needed a tooth extracted.  A Civil War soldier’s teeth were an important consideration though.  Many recruits were rejected for not having opposing upper and lower front teeth.  Without these teeth, a soldier could not easily bite the end off of the paper-wrapped powder cartridges used with their muzzle loading rifles.

Here’s a more familiar sight – a toothbrush.  This one is made of ivory
and boar bristles.  The hole in the handle allowed it to hang from a cord
around the soldier’s neck.

     Some of the medicines used in dentistry during the Civil War can make you shake your head as well.  Creosote was used to “mummify” the root of a tooth – an early form of a root canal!  Cavities were filled with gold foil, tin foil, or an amalgam of tin, silver, and mercury.  

A container for a small creosote bottle.  The  label reads, “POISON!
Saturate a little cotton and apply in hollow of tooth.”

     Dentures were around during the Civil War too.  The one pictured below is made of German silver, also known as nickel silver, and has two porcelain front teeth.  It probably wasn't particularly comfortable, but it got the job done.  


A partial denture and case.


     So, now don’t you feel better about going to your dentist?!


Photos courtesy of the National Museum of Civil War Medicine