Thursday, December 22, 2011

Moving Artifacts


The Pry House, built in 1844, was originally owned by Philip Pry. It now has the distinction of being known as the birthplace of military and emergency medicine because of the plans developed there by Medical Director Dr. Jonathan Letterman.

     Last Friday I was out at the Pry House Field Hospital and Museum, the National Museum of Civil War Medicine’s satellite location out on the Antietam Battlefield.  In 1862, just prior to the Battle of Antietam, the house was commandeered by General George McClellan for use as his headquarters.  Major General Joseph Hooker and General Israel Richardson were treated there after the battle for wounds they received.  General Hooker recovered, but General Richardson died in the house two months later.  His death there resulted in some interesting ghost stories about the house, but I’ll have to save those for a later post!

Here is our operating theater display in the Pry House, depicting Major General Joseph Hooker being treated in one of the first floor rooms. The operating “table” here is a door placed on top of stacked crates. 

The Pry barn was used as a Field Hospital. If you were not a General, this was where you would be treated! Over 400 men were cared for here.
   

     The Pry House closes over the winter, and so the reason for my being there last week was to move the artifacts on display there back to the main museum.  As you might imagine, moving artifacts requires planning, some care, and lots of packing materials!

Here are some of the supplies I use when packing and transporting the artifacts. The sturdy, waterproof containers are padded with ethafoam and acid-free tissue. The cotton gloves are used when handling the artifacts.

     Moving and wrapping artifacts is a methodical process.  This is not an instance when you want to rush!  Each item is wrapped individually.  The larger and studier items, like a cannonball, may only need to be wrapped in some acid-free tissue.  Smaller items or fragile items, like a glass syringe, are also wrapped in ethafoam and packed in smaller boxes for protection. 


Very small items like this bullet are first put into a sealed, labeled bag. It will then be placed into a small box so that it doesn’t get lost in the packing materials!


     When a packing box is filed, all the empty spaces are then filled with more tissue and foam to prevent the items from shifting during transport.  Lids are secured on the boxes to keep everything in place, to protect the packed items from the weather, and to buffer them from the change in environmental conditions as they are taken outside (remember last week’s post on the dangers of rapidly fluctuating temperatures and RH?).


Here’s an amputation kit on display at the Pry House. My first task will be to put the instruments back into their padded compartments inside the case, and to add more padding as needed to keep them in place.


Here’s the amputation kit with the instruments safely stored inside.


Here’s the amputation kit under several layers of tissue and ethafoam!


     When the artifacts arrive back at the museum, they are kept inside the closed containers for at least 24 hours.  This allows them to acclimate to the new environmental conditions gradually.  Then they are carefully unpacked, inspected for any damage, and monitored for a month before being transferred back to their storage places in the collection room.  If any conservation work is required on them, this is the time it is done!  In the spring, they will be packed again and taken back out to their display cases at the Pry House.

     If you’re ever in the area, please stop by and visit!

If you’re lucky, our unofficial mascot, Lacy, will be there to greet you!

Photos courtesy of the National Museum of Civil War Medicine

*Note:  Due to the holidays, there will be no blog post next week.  Happy New Year everyone, and thanks for reading my blog!

Thursday, December 15, 2011

Field Trip


     Field trips to other museums are always interesting!  Museums often cooperate with each other - artifacts or traveling exhibits are often loaned to and borrowed from other institutions; artifacts can be donated, traded, or sold; research and information can be shared; and partnerships can be formed.  Cooperation between museums benefits everyone.  The institutions involved gain knowledge and can present better exhibits, and visitors can see artifacts they may not have gotten to otherwise.   

Our “Tools of the Trade” exhibit compares and contrasts equipment and supplies used by Confederate and Union doctors. We didn’t have quite enough Confederate items to display, so some of the items here are on loan to us from the Museum of the Confederacy in Richmond, Va. 

This is one of our artifacts, a wooden prosthetic leg which we have out on loan to the Virginia Historical Society.   It is currently part of their traveling exhibit, “An American Turning Point: The Civil War in Virginia.”


     Sometimes too, museums give away useful museum items!  Last Friday, Tom, Kyle, and I went to visit the National Building Museum in Washington D.C. to look at some exhibit cases which they no longer needed and were willing to donate to a nonprofit organization.  Museum quality exhibit cases are not cheap, so we were thrilled that they were offered to us!  And they seemed happy to be clearing some space for one of their new exhibits.  

I was like a kid in a candy store here, looking over all the available exhibit cases! 
Photo courtesy of Tom Frezza.
   

     You might not think there was any connection between a Civil War Medicine Museum and a Building Museum.  However, the National Building Museum is housed in the former U.S. Pension Bureau, which was built shortly after the Civil War.  It even features a terra cotta frieze on the exterior of the building, which depicts Union Army and Navy troops.  We spent a few minutes admiring it before we went inside!

Photo of terra cotta frieze on the National Building Museum found at http://www.nbm.org/about-us/about-the-museum/civil-war-anniversary.html.


     We thoroughly enjoyed our visit, though I do have to admit that I was a bit envious of all the gallery space and storage space they have!  We didn’t get to tour the whole museum while we were there, but we hope to do that when we go back to pick up the cases.

     It appears that Christmas came early for the NMCWM this year – thank you National Building Museum!


Except where otherwise indicated, photos are courtesy of the National Museum of Civil War Medicine.

Thursday, December 8, 2011

Environmental Concerns


     When considering museum fields, most people tend to think of art and history.  Would it surprise you to learn that when working with artifacts a background in science is also necessary? 

     I posted earlier about monitoring for insects at the museum to prevent damage to the artifacts.  The temperature and relative humidity (RH) of the environment must also be monitored.  Temperature and RH are considered together since they are directly related; as the temperature increases the RH decreases, and as the temperature decreases the RH increases.

     Why is this important in protecting artifacts, you ask?  Changes in temperature and RH can affect materials in several different ways.  Most materials expand when they are heated and contract when they are cooled.  Heating or cooling an object to extreme temperatures, or subjecting an object to constantly changing temperatures can cause mechanical damage, like cracking, splitting, or warping.  In addition, organic materials like wood, bone, and paper expand in high RH and contract in low RH, which can cause similar mechanical damages.  The issues can be compounded if an artifact is composed of more than one material, since different materials can expand and contract at different rates.


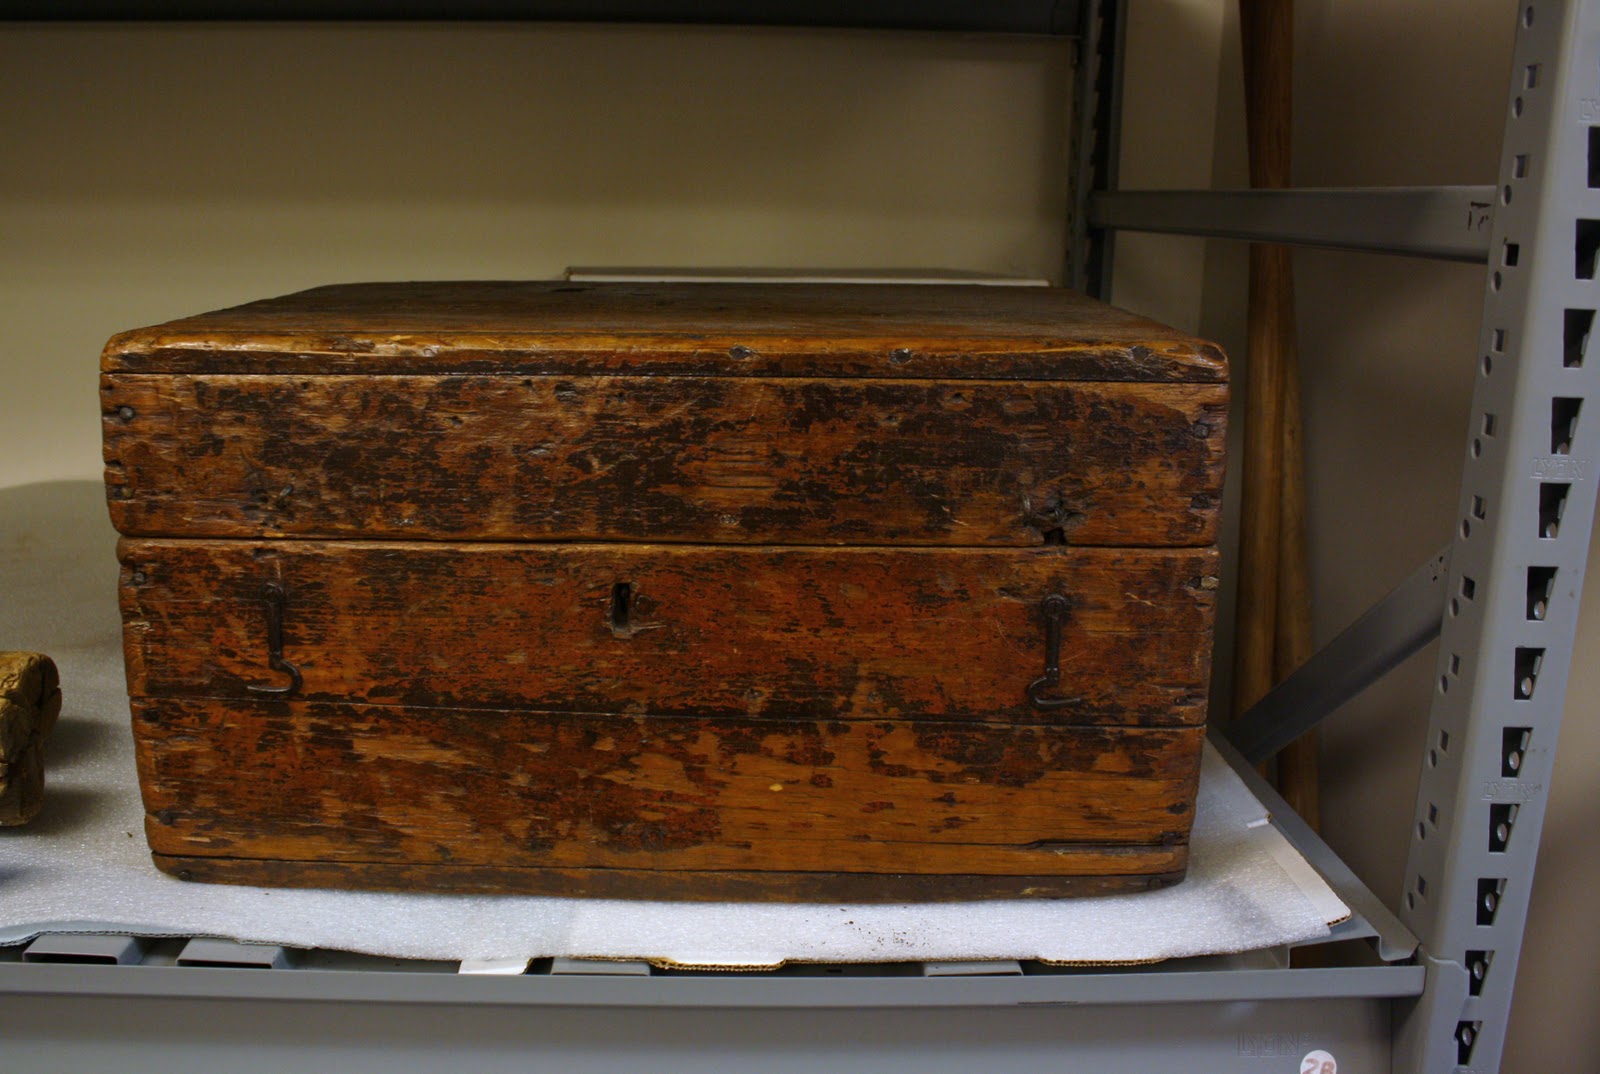
This medical chest lid is made of wood which is reinforced with metal edges. The crack in the wood could be the result of the wood becoming too dry, or of being in an environment which fluctuated. Wood can absorb more moisture than metal, so the crack could be the result of the wood trying to expand further than the metal would allow.   
     

     Changes in temperature and RH can also affect the chemical reactions which cause materials to degrade.  If you ever took a class in chemistry, you should remember that heat speeds the rate of chemical reactions.  Or if you cook, you know that heating a liquid allows substances to be dissolved in it much more quickly!  Water (or a high RH) is also necessary for certain reactions to take place, as in the corrosion of metal.  Other chemical reactions can cause paper to yellow, glass to cloud, and dyes to fade.

This iron pestle exhibits some pitting and spots of rust, resulting from being in an environment with a too high RH.  


     Mold is another danger to artifacts.  Mold spores are in the air all around us, and can grow quickly in a warm, moist environment.  It’s nearly impossible to eliminate the spores from the air, but mold growth can be prevented by keeping the RH below 65%.

This is a small piece of chamois leather with two surgical needles. Notice that the metal needles are rusty and that there is evidence of mold on the corners of the leather. It is a good illustration of the effects of a high RH on an inorganic material (needles) and an organic one (leather).

     At the NMCWM we have small digital thermo-hygrometers for monitoring our exhibit cases.  They measure the temperature and RH and record the high and low points during a set time period.  They also have a display so that the temperature and RH can be checked at a glance. 

The thermo-hygrometer is on the side wall of this exhibit. It is easily visible to me when I need to check the environmental conditions, yet it doesn’t interfere with the display. Most visitors don’t even notice it.


     We also have data loggers placed in the galleries.  They measure the temperature and RH every hour and save the data.  I download them to my computer on a monthly basis, and review them to identify any problem areas.

The data loggers are mounted inside small locked, ventilated Plexiglas cases. Ideally, they should be located on an interior wall near the center of the room, and away from any vents.

Here’s a printout from one of the data loggers (click on photo for larger version). You can clearly see which day our air conditioning unit broke! Notice that as the temperature rose, the RH dropped.

     
It’s one more way I help to preserve and protect the artifacts, and earn my Guardian title!


Photos courtesy of the National Museum of Civil War Medicine.

Thursday, December 1, 2011

Be Thankful

     Since we just celebrated Thanksgiving, the subject of being thankful seems appropriate.  For me, that brings to mind the dental exhibit at the NMCWM.  One look at the dental tools used in the mid-1800s should make anyone thankful that they live today!

These are tooth keys – early tooth extraction devices.  The dentist would
use a twisting and pulling motion to remove a tooth with one of these. 
Are you cringing yet?

Dental forceps replaced tooth keys.  They made tooth extraction somewhat
easier as they were used in a grasping and pulling motion. 


     When the Civil War started, the dental profession was still fairly new, as well as being rather expensive for the average citizen.  Most people only visited a dentist if they needed a tooth extracted.  A Civil War soldier’s teeth were an important consideration though.  Many recruits were rejected for not having opposing upper and lower front teeth.  Without these teeth, a soldier could not easily bite the end off of the paper-wrapped powder cartridges used with their muzzle loading rifles.

Here’s a more familiar sight – a toothbrush.  This one is made of ivory
and boar bristles.  The hole in the handle allowed it to hang from a cord
around the soldier’s neck.

     Some of the medicines used in dentistry during the Civil War can make you shake your head as well.  Creosote was used to “mummify” the root of a tooth – an early form of a root canal!  Cavities were filled with gold foil, tin foil, or an amalgam of tin, silver, and mercury.  

A container for a small creosote bottle.  The  label reads, “POISON!
Saturate a little cotton and apply in hollow of tooth.”

     Dentures were around during the Civil War too.  The one pictured below is made of German silver, also known as nickel silver, and has two porcelain front teeth.  It probably wasn't particularly comfortable, but it got the job done.  


A partial denture and case.


     So, now don’t you feel better about going to your dentist?!


Photos courtesy of the National Museum of Civil War Medicine

Thursday, November 17, 2011

The One Percent

    
     Don’t worry; this has nothing to do with the Occupy protests! 
     It has been my observation that 99% of museum visitors generally behave themselves when going through the exhibits.  It’s the other one percent which make it necessary for all the security measures.
     There are a variety of methods museums can employ to prevent theft or damage to the artifacts on display.  Probably the most common method is placing the items in a display case.
This is a large display case with tempered glass doors which are locked.  This display is also set to trigger an alarm if the doors are opened or broken. 


     Single artifacts or very small groups of artifacts can be placed in smaller display cases.  Sometimes these cases can be incorporated onto a display panel as seen in the photo below.
This artifact, a wooden grave marker, has a Plexiglas cover which is secured to the panel.  The panel is secured to the wall.


This is a vitrine, or small display case, which houses a single artifact.  It has a Plexiglas top which is held in place by security screws.


Another important aspect of exhibit security is pictured in the background – the museum staff!  They inform our guests of the museum’s guidelines (no food, drink, or flash photography in the galleries) and they help to monitor the visitors via the security cameras.
    
     Signage is also a part of museum security.  There are several signs similar to the one pictured below, posted throughout the museum.  We also have signs warning guests of the motion sensors on the open displays.


     Very large artifacts can be challenging to display safely.  In many cases they are placed behind some sort of barrier.  Alarm systems can be used.  Guards can also be employed to monitor these items, but that is generally done more at larger museums.


Here is the largest item in the NMCWM’s collection, a Civil War Surgeon’s tent.  There are several layers of protection for it here, the building security system, the physical barriers (crates and raised floor), its placement beyond the reach of guests, the sign in the lower right corner of the photo, the video camera (not visible here) which is monitored by the front desk staff, and the motion sensor – the small white box in the upper right corner of the photo – which sets off an alarm if triggered.

     Displaying artifacts in open exhibits has similar challenges to displaying the very large ones, and some of the same methods can be used to protect them.  However, additional “tricks” can also be used.  The exhibit in the photo below has the warning sign, the security camera, the physical barriers (the Plexiglas fence plus the display panel placed in front of it), and the motion sensor.  It also has something else which isn’t visible in the first photo.


This Civil War amputation kit is too much of a temptation for a few of our guests.  Though most of our visitors heed the warnings about the space being monitored and alarmed, there are a few who still reach in and attempt to handle the surgical instruments.  As you can see in this photo (click to enlarge the photo), the instruments are further protected by a series of clear monofilaments – the horizontal ones are visible here, but there is also a series of vertical ones, plus one which is looped around the handle of the saw.  The advantage here is that the lines make it more difficult to remove the instruments, and most people do not even see them!

     So, I hope when you are a visitor at a museum, you are more aware of the security measures in place, and that you are not in the dreaded one percent!


Photos courtesy of the National Museum of Civil War Medicine.

Friday, November 4, 2011

An Artifact Story


     This is a photo of another artifact which I like to show to visitors.  Unlike the suppository mold I posted about earlier, many people correctly figure out what this is after studying it for a few moments.  Do you think you know what it is?  Don’t read ahead yet if you want to study the photo a little longer!  I'll even help you out a bit and let you know that this object is hollow.


     Did you guess that the object in the photo is an early version of a stethoscope?  It’s a monaural (single ear) stethoscope to be more exact.  The flat end was placed against the patient, and the doctor was able to listen through the cupped end. 

     The first stethoscope was invented in 1816 by a French physician named Rene Theophile Hyacinthe Laennec.  The story goes that Laennec was examining a young woman and was too embarrassed to put his ear to her chest.  He quickly came up with an alternate method.  In his account: 
     
I recalled a well known acoustic phenomenon: if you place your ear against one end of a wood beam the scratch of a pin at the other end is distinctly audible. It occurred to me that this physical property might serve a useful purpose in the case I was dealing with. I then tightly rolled a sheet of paper, one end of which I placed over the precordium (chest) and my ear to the other. I was surprised and elated to be able to hear the beating of her heart with far greater clearness than I ever had with direct application of my ear. I immediately saw that this might become an indispensable method for studying, not only the beating of the heart, but all movements able of producing sound in the chest cavity."

     And so, the stethoscope was born!


Another wooden monarual stethoscope, which
has been painted black. 
This stethoscope is made of wood and ivory.


     Laennec produced his first stethoscope at home in his workshop.  It was a simple wooden tube at first, but he experimented with different materials and designs.  Other people began making stethoscopes as well and eventually a binaural stethoscope was invented.


George Cammann is credited with designing the binaural model which is the basis for the modern stethoscope.  Does this one look more familiar?


     I am not always so sure that newer models are better though.  Somehow I don’t think the wooden stethoscopes were quite as cold as the modern version my doctors uses!  


Photos courtesy of the National Museum of Civil War Medicine.

Thursday, November 3, 2011

The Collection Room

     Did you ever wonder where museums keep the artifacts which aren’t on display?  Or did you even realize that most museums can usually only exhibit a fraction of their collection?  This is partly due to space constraints.  Most museums simply don’t have the space to exhibit everything at once.  However, it is also better for the artifacts not to be out on exhibit permanently.  Even with good environmental controls and good housekeeping practices in the galleries, the artifacts on display are more likely to be exposed to dirt, dust, insects, and light, than those stored in the collection room.  
     A museum’s collection room is a place where the artifacts can be safely stored.  Ideally, the room is secure, is temperature and humidity controlled, and is dark when no one is working in it.  The light level is the biggest difference between the display cases and the collection room.  Most people are aware that light degrades many materials over time.  You can probably see the effects of light in your own home furnishings.  Just take a look at any curtains, furniture, or photos which are often in direct sunlight.  Unfortunately you can’t have much of an exhibit without light!  However, you also don't want historic artifacts locked away so that no one can ever see or learn from them.  Exhibiting artifacts is a sort of balancing act between preserving them and allowing access to them.  
     Let’s take a quick peek inside the collection room of the NMCWM:
  

Framed artwork, documents, and maps can be hung on the art rack. 
If you recall last week’s post, you may also notice an insect trap on the floor.


Unframed or more fragile artwork, large documents, and photos can be stored
flat in these shallow drawers.  The bottom of each drawer is covered with a sheet
of polyethylene foam (ethafoam) which serves both as cushioning and as a barrier
between the item and the surface of the drawer.


Medium-sized items can be stored on shelves in tall, upright cabinets. 
This is an ambulance water keg.  Civil War ambulance wagons would have
been outfitted with two of these when they were sent out onto the battlefields.


Books are also stored on shelves in these cabinets. 
These books have each been fitted with acid-free cardboard
covers for further protection against light, dust, and abrasion.


Documents up to legal-size are kept in the same kind of cabinets. 
They are housed in archival folders inside these document boxes.


Small and medium-sized items are kept in cabinet drawers. 
Here you see a collection of medicine bottles which were part of a Confederate
drug kit.  Notice that each bottle has its own padded compartment in the drawer,
which prevents damage to them when the drawer is opened and closed.


Large items can be stored on open shelves. 
This is a wooden medical chest which contained drugs and
hospital supplies and was used by the U.S. Hospital Department
during the Civil War. 


Very large items, like this Civil War dentist’s chair, must simply be stored
on the floor of the collection room.  
This dentist’s chair has an adjustable headrest and seat, and it reclines.  The
octagonal wooden tray on the left arm held the dental instruments, and it can
be swiveled to various positions.  The metal ring attached to the right arm
would have held a spittoon.  Even then, dental patients had to rinse and spit!

     I hope you enjoyed your photo tour of the collection room.  If you’re like me, you’ve spotted quite a few interesting artifacts along the way.  That’s the best part of touring any collection room!  We’ll have to come back another time for a closer look at some of them.  


Photos courtesy of the National Museum of Civil War Medicine.